Demo Các hướng dẫn thủ thuât trên Blogsopt

Latest Post
Add-on Wordpress Plugin Adsense Backlinks Best Blogger Template Blog And Magazine Wordpress Themes Blogger Gadgets Blogger Plugins Blogger SEO Blogger SEO Tips Blogger Templates Blogger Tricks Blogger Tutorials Blogger Widgets Blogging Blogspot Series BlueHost Business City CodeCanyon Computer Corporate Wordpress Theme Creative Creative Market Creative Wordpress Theme CSS Cuisines Destination Directory & Listings Domain eCommerce WordPress Plugin eCommerce Wordpress Theme Extensions Pack Facebook Fashion FontAwesome Foods Gallery Google Google AdSense Google Webmaster Tools Hack Host Hosting HTML Hướng dẫn JavaScript Magazine Blogger Template Make Money Online Marketing Material Design Membership Miscellaneous MultiMedia Blogger Templates Multipurpose Blogger Template Music MySQL News News Blogger Template People Phần mềm Phones Photography PHP Portfolio Premium Blogger Templates Productivity Responsive Blogger Template Rss Subscribe Widget SEO SEO Optimized Blogspot Templates SEO Tips SEO Wordpress SEO Wordpress Tips Server Social Media Share Button Social Subscription Widget Software Soliloquywp Speaker Tablets Tài liệu Tech Technology Template Blogspot TheEventsCalendar Thủ Thuật Thủ Thuật Blogger Thủ Thuật Máy Tính Tin tức Tool Travel Trends Utilities WordPress Plugin Video Wedding Widgets WooCommerce Wordpress Plugin Wordpress Seo Wordpress ThemeForest Themes Wordpress Themes Wordpress Tricks Wordpress Tutorials World News WP Plugins WP Sliders Yahoo Youtube

How to implement add prism syntax highlighter for highlighting code in blogger template
Hello Folks,Today in this article we are going to share How to Add Prism Syntax Highlighter (Light Weight) For blogger template.we have already shared tutorial on Highlighting the code snippet in blogspot themes like Shortcode syntax highlighter . First prism code sharing widget is launched for wordpress now you can easily use in blogger template.Prism is very light weighted elegant syntax highlighter Robust.Syntax highlighter is written in java script and CSS.It is easily customizable and very simple to add in blogger websites or blog.Author of Prism Syntax Highlighter is Lea Verou you can reach her by visiting http://lea.verou.me/ . In syntax highlighter you can share your code snippets with numbering and colorful code display.You can add HTML , CSS , JAVASCRIPT and JQUERY in syntax highlighter.
The most important part of the prism elegant code snippet highlighter is that when you share HTML code you need to convert HTML entity by visiting this HTML Encode Tool in order to display the code in syntax highlighter.Still we have seen so many blogger website using blockquote to sharing codes with their readers.However you can modify block quote too but to display code in perfect view to visitors you must install Prism Syntax Highlighter in Blogger template.You can customize syntax highlighter css in order to change the view of codes display, heading of code snippet box ,fonts and colors.So to grab Prism Syntax Highlighter, Robuts, Elegant for your blogger template follow the steps mentioned below.
DEMO

How To Add Prism Syntax Highlighter In Blogger Template

Installation Steps:

Step 1. Log in to your Blogger account and Go to your Blogger Dashboard.
Step 2. Now Click on -> Template -> Edit HTML.
Step 3. Now Search for ]]></b:skin> or </style> by Pressing Ctrl+F keys.
Step 4. Now Copy the below CSS code snippet and past just before/above </style> or ]]></b:skin>.

/* CSS Prism Syntax Highlighter By www.Bloggersstand.com */
pre {
padding: 48px 10px 10px 10px;
margin: .5em 0;
white-space: pre;
word-wrap: break-word;
overflow: auto;
background-color: #1F232A;
position: relative;
border-radius: 4px;
max-height: 500px;
}

pre::before {
font-size: 16px;
content: attrundefinedtitle);
position: absolute;
top: 0;
background-color: #666;
padding: 10px;
left: 0;
right: 0;
color: #fff;
text-transform: uppercase;
display: block;
margin: 0 0 15px 0;
font-weight: bold;
}

pre::after {
content: 'Double click to select';
padding: 2px 10px;
width: auto;
height: auto;
position: absolute;
right: 8px;
top: 8px;
color: #fff;
line-height: 20px;
transition: all 0.4s ease-in-out;
}

pre:hover::after {
opacity: 0;
top: -8px;
visibility: visible;
}

code {
font-family: Consolas,Monaco,'
Andale Mono','Courier New',Courier,Monospace;
line-height: 16px;
color: #607779;
background-color: transparent;
padding: 1px 2px;
font-size: 12px;
}

pre code {
display: block;
background: none;
border: none;
color: #FEFEFE;
direction: ltr;
text-align: left;
word-spacing: normal;
padding: 0 0;
font-weight: bold;
}

code .token.punctuation {
color: #ccc;
}

pre code .token.punctuation {
color: #fafafa;
}

code .token.comment,code .token.prolog,code .token.doctype,code .token.cdata {
color: #BEBCBC;
}

code .namespace {
opacity: .8;
}

code .token.property,code .token.tag,code .token.boolean,code .token.number {
color: #FFE500;
}

code .token.selector,code .token.attr-name,code .token.string {
color: #88a9ad;
}

pre code .token.selector,pre code .token.attr-name {
color: #fafafa;
}

pre code .token.string {
color: #A2FEA5;
}

code .token.entity,code .token.url,pre .language-css .token.string,pre .style .token.string {
color: #ccc;
}

code .token.operator {
color: #8ECEFE;
}

code .token.atrule,code .token.attr-value {
color: #006B6B;
}

pre code .token.atrule,pre code .token.attr-value {
color: #FEB380;
}

code .token.keyword {
color: #9D2200;
font-style: italic;
}

code .token.comment {
font-style: italic;
}

code .token.regex {
color: #ccc;
}

code .token.important {
font-weight: bold;
}

code .token.entity {
cursor: help;
}

pre mark {
background-color: #FEAAAA!important;
color: #fff!important;
padding: 2px;
border-radius: 2px;
}

code mark {
background-color: #ea4f4e!important;
color: #fff!important;
padding: 2px;
border-radius: 2px;
}

pre code mark {
background-color: #A33636!important;
color: #fff!important;
padding: 2px;
border-radius: 2px;
}

.comments pre {
padding: 10px 10px 15px 10px;
background: #2c323c;
}

.comments pre::before {
content: 'Code';
font-size: 13px;
position: relative;
top: 0;
background-color: #f56954;
padding: 3px 10px;
left: 0;
right: 0;
color: #fff;
text-transform: uppercase;
display: inline-block;
margin: 0 0 10px 0;
font-weight: bold;
border-radius: 4px;
border: none;
}

.comments pre::after {
font-size: 11px;
}

.comments pre code {
color: #eee;
}

.comments pre.line-numbers {
padding-left: 10px;
}

pre.line-numbers {
position: relative;
padding-left: 3.0em;
counter-reset: linenumber;
}

pre.line-numbers > code {
position: relative;
}

.line-numbers .line-numbers-rows {
height: 100%;
position: absolute;
pointer-events: none;
top: 0;
font-size: 100%;
left: -3.5em;
width: 3em;
-webkit-user-select: none;
-moz-user-select: none;
-ms-user-select: none;
padding: 0;
}

.line-numbers-rows > span {
pointer-events: none;
display: block;
counter-increment: linenumber;
}

.line-numbers-rows > span:before {
content: counterundefinedlinenumber);
color: #666;
display: block;
padding-right: 0.8em;
text-align: right;
transition: 350ms;
}

pre[data-codetype='CSS']:before {
background-color: #AA80FE;
}

pre[data-codetype='HTML']:before {
background-color: #FFB200;
}

pre[data-codetype='JavaScript']:before {
background-color: #00B366;
}

pre[data-codetype='JQuery']:before {
background-color: #009999;
}
Step 5 . Now Search For Closing the </body> tag and copy the below java script and jquery paste all of them ( one by one ) just above/before </body>tag.
<script src='https://googledrive.com/host/0B58fhAmOxE7EbDFKTmhfRXFCRUk' type='text/javascript'></script>

Step 6. Now Save your Template

How To Add Prism Syntax Highlighter In Blogger Posts For Sharing Code

In order to add prism syntax (code) highlighter in blogger posts you need to add the html code in your posts.Just change your compose view mode to HTML mode and paste the desired code to display javascript , jquery , css or html choose tags and paste your codes between the tags and hit publish button.For Sharing HTML code you first must encode the code by visiting HTML ENCODER TOOL.
<pre title="HTML" data-codetype ="HTML"><code class="language-markup">HTML ESCAPED CODE HERE</code></pre>
<pre title="CSS" data-codetype ="CSS"><code class="language-css">CSS CODE HERE</code></pre>
<pre title="Javascript" data-codetype ="JavaScript"><code class="language-javascript">JAVASCRIPT CODE HERE</code></pre>
<pre title="jQuery" data-codetype ="JQuery"><code class="language-javascript">JQUERY CODE HERE</code></pre>

india-south-africa-world-t20-warmp-up-match-live-updates

India Vs South Africa T20 World Cup 2016 Live Streaming Score Card, Warm Up Match, IND Vs SA ICC T20 World Cup 2016 Warm Up Match Mumbai Live Updates, Toss Time and Scores Updates Youtube Online Telecasting Information.
Date: March 12, Saturday
Time:  07:30 PM IST 

Venue: Wankhede Stadium, Mumbai.
Team Squads:

India: Rohit Sharma, Shikhar Dhawan, Virat Kohli, Suresh Raina, Yuvraj Singh, MS Dhoni (C & WK), Ravindra Jadeja, Hardik Pandya, Ravichandran Ashwin, Ashish Nehra, Jasprit Bumrah, Ajinkya Rahane, Harbhajan Singh, Mohammad Shami, Pawan Negi.

South Africa: Faf du Plessis (C), Hashim Amla, Quinton de Kock (wk), Jean-Paul Duminy, David Miller, Aaron Phangiso, Rilee Rossouw, David Wiese, Kyle Abbott, Farhaan Behardien, AB de Villiers, Imran Tahir, Chris Morris, Kagiso Rabada, Dale Steyn. 

India Vs South Africa Warm Up Match Live Streaming and score Card: T20 world cup Warm-up matche Live score will be updated here ball by ball tay tuned on Bloggersstand for more updates of IND v SA Warmup match.

#Toss:South Africa have opted to bat against india in Mumbai.
#South Africa: Opens with Amla and De Kock out, India starts with Harbhajan Singh.
Live updates Below:

installing valid html 5 and data-vocabulary.org breadcrumbs in blogger template
Are you using Breadcrumb Trail Navigation System in your blogger website or blog ? Do you know the benefits of installing Breadcrumb functions in your blogspot theme? Don't worry if you have not yet installed SEO friendly and valid HTML 5 with Schema.org markup today we are going to share How to Add Schema.org Markup and Valid HTML5 Breadcrumb in blogger.

What is Breadcrumb?

Breadcrumbs are the easiest way to display navigation system for user interface.It also called Trail Navigation System.Trail navigation system looks like Home->Labels->Widgets->Post Name.Breadcrumbs are user and SEO friendly.It provide the navigation information of your website or blog to google for rich snippets in google search result.Nowdays there are lot of improvements occurs in rich snippets , year back Schema.Org markup launched and HTML 5 version is out ,so if your blogger website or blog template is old like 2-3 years then you must re install the breadcrumbs in your blogspot theme.

Benefits of Installing Breadcrumbs in Blogger template

So till now we expect that you must understood what is a breadcrumbs and what's the use of breadcrumbs in blogger template.If you add breadcrumbs in your blogger template then you must keep this in your mind you have enabled navigation system for google rich snippets.In order to improve your rich snippet in google search result page you must add schema Data-vocabulary.org markup with the touch of valid HTML 5 in your breadcrumb have added all the important elements in the breadcrumb code snippet.We have seen still lot's of website does not have valid HTML 5 and Schema markup result their website or blogs rank is decreasing because now google have updated their algorithms to support the schema.org markup websites.Breadcrumb with data vocabulary markup is very easy to install in blogger and it will also help to improve your SEO and Alexa Ranking.So you must add schema markup breadcrumbs , in order to install follow the steps mentioned below.

How to Add Valid HTML 5 + Schema Markup Verified Breadcrumbs in blogger

Installation Steps:
Step 1. Log in to your Blogger account and Go to your Blogger Dashboard.
Step 2. Now Click on -> Template -> Edit HTML.
Step 3. Now Search for ]]></b:skin> or </style> by Pressing Ctrl+F keys.
Step 4. Now Copy the below CSS code snippet and past just before/above </style> or ]]></b:skin>.
.breadcrumbs{padding:10px;margin-bottom:20px;margin-top:0px;font-size:12px;color:#3F3F3F;border-bottom:1px dotted #828282;}
Step 5. Now Search for the following code snippet <b:includable id='main' var='top'> and replace with the below code.

<b:includable id='breadcrumb' var='posts'><b:if cond='data:blog.homepageUrl != data:blog.url'>
<b:if cond='data:blog.pageType == &quot;static_page&quot;'>
<div class='breadcrumbs'><span><a expr:href='data:blog.homepageUrl' rel='tag'>Home</a></span> &#187; <span><data:blog.pageName/></span></div>
<b:else/>
<b:if cond='data:blog.pageType == &quot;item&quot;'>
<!-- breadcrumb for the post page -->
<b:loop values='data:posts' var='post'>
<b:if cond='data:post.labels'>
<div class='breadcrumbs'>
<span itemscope='' itemtype='http://data-vocabulary.org/Breadcrumb'><a expr:href='data:blog.homepageUrl' itemprop='url'><span itemprop='title'>Home</span></a></span>
<b:loop values='data:post.labels' var='label'>
&#187; <span itemscope='' itemtype='http://data-vocabulary.org/Breadcrumb'><a expr:href='data:label.url' itemprop='url'><span itemprop='title'><data:label.name/></span></a></span>
</b:loop>
&#187; <span><data:post.title/></span>
</div>
<b:else/>
<div class='breadcrumbs'><span><a expr:href='data:blog.homepageUrl' rel='tag'>Home</a></span> &#187; <span>Unlabelled</span> &#187; <span><data:post.title/></span></div>
</b:if>
</b:loop>
<b:else/>
<b:if cond='data:blog.pageType == &quot;archive&quot;'>
<!-- breadcrumb for the label archive page and search pages.. -->
<div class='breadcrumbs'>
<span><a expr:href='data:blog.homepageUrl'>Home</a></span> &#187; <span>Archive For<data:blog.pageName/></span>
</div>
<b:else/>
<b:if cond='data:blog.pageType == &quot;index&quot;'>
<div class='breadcrumbs'>
<b:if cond='data:blog.pageName == &quot;&quot;'>
<span><a expr:href='data:blog.homepageUrl'>Home</a></span> &#187; <span>All Posts</span>
<b:else/>
<span><a expr:href='data:blog.homepageUrl'>Home</a></span> &#187; <span>Posts under <data:blog.pageName/></span>
</b:if>
</div>
</b:if>
</b:if>
</b:if>
</b:if>
</b:if>
</b:includable>
<b:includable id='main' var='top'>
<b:include data='posts' name='breadcrumb'/>

Step 6. Now Save your Template...Done !

Now Visit the below google structure data testing tool url to check that you have installed correctly breadcrumbs in your blogger template.
if you have installed correctly you will see the result like this:
breadcrumbs testing in google structure data testing tool

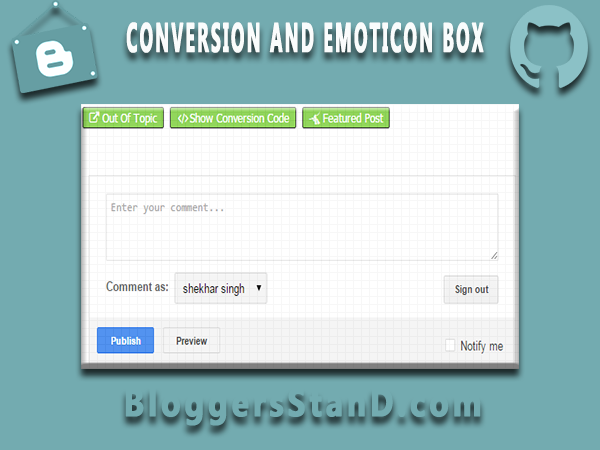
How To Add Conversion And Emotions+smileys+ for blogger Threaded Comment
Hello Folks , Today we are going to explain How to add conversion/converter/parser box with Emoticon/Smileys in blogger template.We have already talked about installing unique beautiful blogger threaded comment system for custom/default blogger template.so you guys have noticed in so many websites or blog that when you are going to write on comment box,just above the comment box you have seen Conversion Box (Konversi) and Emoticon (Emotions/Smiley) box embed in the blogger comment box.If your blog or website is for web development then you must install blogger code parser or conversion code inside blogspot template.Reason is when you are sharing codes with your readers and they might have facing difficulties so they will try to talk about the code in comments that time you need to share copy of codes..so in that case you must embed/implement conversion code widget in blogger template.
Apart from all this we have installed blogger smileys funtion with conversion box,so if someone want's to share expression/emotions they can use the emoticons too.We have used CSS for styling and Javascript for blogger conversion (konversi) box.It has function when you click on Show conversion box it will slide down and the converter box will display ,reader have to past the code and hit convert button to parse their code.You can share Images , youtube embed code,javascript,html,facebook page link,url almost you can share anything in the comment box after installing the blogger conversion box.In order to grab this trick just follow the steps mentioned below.

How to install Conversion box and smileys in blogger comment section

Installation Steps:[First Install Blogger Threaded Comment System Then Only It Works.]
Step 1. Log in to your Blogger account and Go to your Blogger Dashboard.
Step 2. Now Click on -> Template -> Edit HTML.
Step 3. Now Search for the below code by using CTRL + F , CMD+F (Mac) Keys.
<div id='threaded-comment-form'>
<p><data:blogCommentMessage/></p>
Step 4. Now copy the below code and paste just after <p><data:blogCommentMessage/></p>
<span class='small-button1'>
<a href='#' target='_blank' title='Out Of Topic'>Out Of Topic</a>
</span>
<span class='small-button'>
<span id='show-conversion'><a class='conversion-button' href='javascript:voidundefined0)' onclick='document.getElementByIdundefined&apos;conversion-box&apos;).style.display=&apos;inline-block&apos;;document.getElementByIdundefined&apos;hide-conversion&apos;).style.display=&apos;inline-block&apos;;document.getElementByIdundefined&apos;show-conversion&apos;).style.display=&apos;none&apos;' title='Show conversion Code'>Show Conversion Code</a></span><span id='hide-conversion'><a class='conversion-button' href='javascript:voidundefined0)' onclick='document.getElementByIdundefined&apos;conversion-box&apos;).style.display=&apos;none&apos;;document.getElementByIdundefined&apos;hide-conversion&apos;).style.display=&apos;none&apos;;document.getElementByIdundefined&apos;show-conversion&apos;).style.display=&apos;inline-block&apos;' title='Hide Conversion Code'>Hide Conversion Code</a></span>
</span>
<span class='small-button'>
<span id='show-emo'><a class='emo-button' href='javascript:voidundefined0)' onclick='document.getElementByIdundefined&apos;emo-box&apos;).style.display=&apos;inline-block&apos;;document.getElementByIdundefined&apos;hide-emo&apos;).style.display=&apos;inline-block&apos;;document.getElementByIdundefined&apos;show-emo&apos;).style.display=&apos;none&apos;' title='Show Emoticon'>Show Emoticon</a></span><span id='hide-emo'><a class='emo-button' href='javascript:voidundefined0)' onclick='document.getElementByIdundefined&apos;emo-box&apos;).style.display=&apos;none&apos;;document.getElementByIdundefined&apos;hide-emo&apos;).style.display=&apos;none&apos;;document.getElementByIdundefined&apos;show-emo&apos;).style.display=&apos;inline-block&apos;' title='Hide Emoticon'>Hide Emoticon</a></span>
</span>
</p>
<div id='conversion-box'>
<textarea id='codes' placeholder='Write / paste the code here and click &apos;conversion&apos;' spellcheck='false'/>
<span class='button-group'>
<button id='cvrt' onclick='cdConvertundefined);this.disabled = true;'>Conversion</button>
<button onclick='cdClearundefined);'>Remove</button>
</span>
<span class='checkbox'>
<input checked='' id='opt1' type='checkbox'/> <input id='opt2' type='checkbox'/> <input id='opt3' type='checkbox'/> <input checked='' id='opt4' type='checkbox'/> <input checked='' id='opt5' type='checkbox'/></span>
</div>
<div id='emo-box'>
<div class='comment_emo_list'/>
</div>
<data:blogTeamBlogMessage/>
<a expr:href='&quot;http://www.blogger.com/comment-iframe.g?blogID=&quot; + data:blog.blogId + &quot;&amp;amp;postID=&quot; + data:post.id' id='comment-editor-src' title='comment editor'/>
<iframe class='blogger-iframe-colorize blogger-comment-from-post' height='410' id='comment-editor' name='comment-editor'/>
</div>
</b:if>
<data:post.friendConnectJs/>
<data:post.cmtfpIframe/>
<script type='text/javascript'>
BLOG_CMT_createIframeundefined&#39;<data:post.appRpcRelayPath/>&#39;, &#39;<data:post.communityId/>&#39;);
</script>
</div>
</b:includable>
Step 5. Now Search For the closing </body> tag  and copy the below java script and paste it just above/before the </body> tag.
 
Step 6. Now Search for ]]></b:skin> or </style> by Pressing Ctrl+F keys.

Step 7. Copy the below CSS code and paste it just before the ]]></b:skin> or </style> tag.
/* Conversion Box by www.bloggersstand.com */
.comment_emo_list .item{float:left;text-align:center;height:40px;width:41px;margin:0 0 10px;}
.comment_emo_list span{display:block;font-weight:400;font-size:11px;letter-spacing:1px;color:#444}
.comment_youtube{max-width:100%!important;width:400px;height:225px;display:block;margin:auto}
.comment_img{max-width:100%!important}
#respond{overflow:hidden;padding-left:10px;clear:both}
#conversion-box, #hide-conversion,#emo-box,#hide-emo {display:none}
#conversion-box {width:100%;color:#eee;background:none;line-height:1.6em;margin-bottom:20px;padding:0;text-align:left;}
.checkbox{font:11px Tahoma,Verdana,Arial,Sans-Serif;line-height:1.6em;color:#eee;}
#codes{border:1px solid #ccc;width:98%;height:200px;display:block;background-color:#ddd;border-radius:3px;font:normal 12px 'Courier New',Monospace;margin:7px 0 10px;padding:5px}
#codes:focus{background-color:#fff;color:#666;border:1px solid #ddd;outline:none}
.button-group{float:right;text-align:left;margin:0 auto}
button,button[disabled]:active{font-size:12px;font-family:Arial;font-weight:normal;border-radius:3px;border:1px solid #49a5bf;padding:3px 10px;text-decoration:none;background:linear-gradient(to bottom, #93cede 0%, #75bdd1 41%, #49a5bf 100%);color:#ffffff;display:inline-block;text-shadow:1px 1px 0px #528ecc;box-shadow:inset 1px 1px 0px 0px #bbdaf7;cursor:pointer}
button:hover{color:#000}
button:active{color:#000}
button[disabled],button[disabled]:active{color:#000;cursor:default}
#opt1,#opt2,#opt3,#opt4,#opt5{display:inline-block;vertical-align:middle;border:none;outline:none;margin:0 10px 0 0}
.small-button a,.small-button1 a {border:1px solid #333;color:#fff;font:13px Tahoma;cursor:pointer;font-weight:400;margin:15px 5px 5px 0;text-decoration:none;text-transform:none;text-shadow:none;border-radius:2px;display:inline-block;background-color:#444;padding:2px 8px;cursor:pointer}
.small-button:hover a,.small-button1:hover a{color:#111;text-shadow:none;border:1px solid #333;border-radius:2px;display:inline-block;background-color:#777}
Step 8.Now Save your template..Done !

How to add custom threaded comments in blogger template
Do you have Custom Blogger Threaded Style? Are you using Default Comments System ? Do you know the advantages of blogger threaded comment system ? Don't worry today in this tutorial we will share you How to Add + Enable Customized Blogger Threaded Comments in Custom Template.For the Demo of blogger threaded comments function look our comments system,it's really unique and look very beautiful and attractive.However there are so many tutorials on styling the blogger default comments system to threaded comments hack for blogger website or blog.But i must say you will find our one is totally different from the others.We have tried our best to serve you the best.Later on we will share you how to add conversion box , emotions , comment form message in blogger comments box for that keep visiting and stay tuned.One of our precious reader asked for the Threaded comment system and we are here with this trick,blogger threaded comment hack system is very easy to install in template.
In the blogger threaded comments hack we have used CSS for styling the comments section ,you can also do it yourself but first for that you need knowledge of CSS..but don't worry we are here for you..if you need any other design then free to ask us we would love to help you.In order to install Customized Blogger threaded comment system follow the steps mentioned below.

How to Add stylish Blogger threaded comment hack in template

Installation Steps:
Step 1. Log in to your Blogger account and Go to your Blogger Dashboard.
Step 2. Now Click on -> Template -> Edit HTML.
Step 3. Now Search for the below code by using CTRL + F , CMD+F (Mac) Keys.
<b:include data='post' name='threaded_comments'/>
Step 4. Now replace the above code snippet with the following below code.
 <b:include data='post' name='comments'/>
Step 5. Now Search for the following code snippet
<b:includable id='comments' var='post'>.....</b:includable> 
Step 6. Now Replace the above code snippet and all inside code between <b: includable ... </b:includable> with the below code snippet.
 <b:includable id='comments' var='post'>
     <div class='comments' id='comments'>
        <b:if cond='data:post.allowComments'>
          <h5> <b:if cond='data:post.numComments == 0'> <span itemprop='interactionCount'>0</span>
comments on &quot;<data:blog.pageName/>&quot;</b:if> <b:if cond='data:post.numComments == 1'> <span itemprop='interactionCount'>1</span>
comments on &quot;<data:blog.pageName/>&quot; </b:if> <b:if cond='data:post.numComments &gt; 1'> <span itemprop='interactionCount'><data:post.numComments/></span>
comments on &quot;<data:blog.pageName/>&quot; </b:if> </h5>
    <b:if cond='data:post.commentPagingRequired'>
      <span class='paging-control-container'>
        <a expr:class='data:post.oldLinkClass' expr:href='data:post.oldestLinkUrl'>
          <data:post.oldestLinkText/>
        </a>
        &#160;
        <a expr:class='data:post.oldLinkClass' expr:href='data:post.olderLinkUrl'>
          <data:post.olderLinkText/>
        </a>
        &#160;
        <data:post.commentRangeText/>
        &#160;
        <a expr:class='data:post.newLinkClass' expr:href='data:post.newerLinkUrl'>
          <data:post.newerLinkText/>
        </a>
        &#160;
        <a expr:class='data:post.newLinkClass' expr:href='data:post.newestLinkUrl'>
          <data:post.newestLinkText/>
        </a>
      </span>
    </b:if>
    <div class='clear'/>
    <div id='comment_block'>
      <b:loop values='data:post.comments' var='comment'>
         <div data-level='0' expr:class='data:comment.adminClass' expr:id='data:comment.anchorName'>
          <b:if cond='data:comment.isDeleted'>
            <span class='deleted-comment'>
              <data:comment.body/> - <a class='comment_remove' expr:href='&quot;http://www.blogger.com/delete-comment.g?blogID=&quot; + data:blog.blogId + &quot;&amp;amp;postID=&quot; + data:comment.id' expr:title='data:top.deleteCommentMsg'>
                Clear
              </a>
            </span>
            <b:else/>
            <b:if cond='data:post.adminClass == data:comment.adminClass'>
              &lt;div class=&#39;comment_inner comment_admin&#39;&gt;
              <b:else/>
              &lt;div class=&#39;comment_inner&#39;&gt;
            </b:if>
            <div class='comment_header'>
              <div class='comment_avatar'>
                <img alt='avatar' expr:src='data:comment.authorAvatarSrc' expr:title='data:comment.author'/>
              </div>
 <a class='comment_reply' expr:href='&quot;#r_&quot;+data:comment.anchorName' expr:id='&quot;r&quot;+data:comment.anchorName' onclick='javascript:Display_Reply_Form(this)' title='Reply'>REPLY</a>
            </div>
            <div class='comment_body'>
<div class='cm_head'>
<div class='cm_infonm'>
              <div class='comment_name'>
                <b:if cond='data:comment.authorUrl'>
                  <a expr:href='data:comment.authorUrl' expr:title='data:comment.author' rel='nofollow' target='_blank'>
                   <data:comment.author/>
                  </a>
                  <b:else/>
                 <data:comment.author/>
                </b:if>
                <b:if cond='data:comment.author == data:post.author'/>
              </div>
              <div class='comment_service'>
                <a expr:href='data:comment.url' rel='nofollow' title='Permalink'>
                   <span class='comment_date'>
                      <data:comment.timestamp/>
                    </span>
                </a>
              </div>
</div>
<a class='comment-delete' expr:href='&quot;http://www.blogger.com/delete-comment.g?blogID=&quot; + data:blog.blogId + &quot;&amp;amp;postID=&quot; + data:comment.id' expr:title='data:top.deleteCommentMsg'>
<img alt='delete' src='https://blogger.googleusercontent.com/img/b/R29vZ2xl/AVvXsEg7ScnKGihejB6dGejl0wgcbhyJ8GXzM2ON7ziHxL06KFtR0uOJNOchSjrZoCtEIUxjBvvTFzWGuWpq0IVo9rnj-UK8WQnCyqZlDHEfg8WqLrFjyZ62D5Wr5bcgIl6XI4cG_Z6-yh-nbLE/s1600/delete4.png' title='Delete Comment'/>
</a>
</div>
              <p><data:comment.body/></p>
            </div>
            <div class='clear'/>
            &lt;/div&gt;
            <div class='clear'/>
            <div class='comment_child'/>
            <div class='comment_reply_form' expr:id='&quot;r_f_&quot;+data:comment.anchorName'/>
          </b:if>
        </div>
      </b:loop>
    </div>
    <div class='clear'/>
    <b:if cond='data:post.commentPagingRequired'>
      <span class='paging-control-container'>
        <a expr:class='data:post.oldLinkClass' expr:href='data:post.oldestLinkUrl'>
          <data:post.oldestLinkText/>
        </a>
        &#160;
        <a expr:class='data:post.oldLinkClass' expr:href='data:post.olderLinkUrl'>
          <data:post.olderLinkText/>
        </a>
        &#160;
        <data:post.commentRangeText/>
        &#160;
        <a expr:class='data:post.newLinkClass' expr:href='data:post.newerLinkUrl'>
          <data:post.newerLinkText/>
        </a>
        &#160;
        <a expr:class='data:post.newLinkClass' expr:href='data:post.newestLinkUrl'>
          <data:post.newestLinkText/>
        </a>
      </span>
    </b:if>
    <div class='clear'/>
    <div class='comment_form'>
      <b:if cond='data:post.embedCommentForm'>
        <b:if cond='data:post.allowNewComments'>
          <div class='comment_emo_list'/>
          <b:include data='post' name='threaded-comment-form'/>
          <b:else/>
          <data:post.noNewCommentsText/>
        </b:if>
        <b:else/>
        <b:if cond='data:post.allowComments'>
          <a expr:href='data:post.addCommentUrl' expr:onclick='data:post.addCommentOnclick' expr:title='data:postCommentMsg'>
            <data:postCommentMsg/>
          </a>
        </b:if>
      </b:if>
    </div>
  </b:if>
</div>
 <script type='text/javascript'>
       //<![CDATA[
       if (typeof(jQuery) == 'undefined') {
 //output the script (load it from google api)
 document.write("<scr" + "ipt type=\"text/javascript\" src=\"http://ajax.googleapis.com/ajax/libs/jquery/1.7.1/jquery.min.js\"></scr" + "ipt>");
}
       //]]>
       </script>
   
       <script async='async' src='//www.blogblog.com/dynamicviews/4224c15c4e7c9321/js/comments.js' type='text/javascript'/>
       <script type='text/javascript'>
   
         <b:if cond='data:post.numComments != 0'>
         var Items = <data:post.commentJso/>;
         var Msgs = <data:post.commentMsgs/>;
         var Config = <data:post.commentConfig/>;
        <b:else/>
         var Items = {};
         var Msgs = {};
         var Config = {&#39;maxThreadDepth&#39;:&#39;0&#39;};
        </b:if>
       //<![CDATA[
       //Global setting
        Config.maxThreadDepth = 3;//Depth level threaded comment
        Display_Emo = false;//Show emoticons? type "false" to hide
        Replace_Youtube_Link = true;//Embed YouTube videos, type "false" to disable
        Replace_Image_Link = true;//Auto replace the image link, type "false" to disable.
        Replace_Force_Tag = false;//Auto replace virtual tag example: [pre] becomes <pre>, and [/ pre] becomes </ pre>, if one writes, will not work
        Replace_Image_Ext = ['JPG', 'GIF', 'PNG', 'BMP'];//(support: jpg, gif, png, bmp),only works when Replace_Image_Link = true
   
        //Setting Emoticon
        Emo_List = [
        ':)'  ,'https://blogger.googleusercontent.com/img/b/R29vZ2xl/AVvXsEiZ979HHyPM5F9opXhALHbD4tKPXO7a9I5wLQbOl4zEEUN5YwNvWkWNG2cGtulWPkYm3PXwsNS0deXxau4YxeEcfsZAL7zcgjnJN8Qcu_3C-1H6mNzr7q9EhQPeP20855HDUFn631BptazK/s1600/happy-yahoo-emoticon.gif',
        ':('  ,'https://blogger.googleusercontent.com/img/b/R29vZ2xl/AVvXsEicBMWtjAqNAv2MlXLd3t5mEUxEC8n-dpcdI2q62SRNO0gcx5QIVXfICjWaYJjcbKt0NSj6z-3K1qlhujmAyw87N3zjkprWheyRnXrhc6wKef0D7FHKgQdbubw6bc9Dge63CP0HMu29h0pS/s1600/sad-yahoo-emoticon.gif',
        ' =('  ,'https://blogger.googleusercontent.com/img/b/R29vZ2xl/AVvXsEjCefhKRTvnk0Sl9jCYyTFE-SkT1z9UrfppKE7vA68axna1siIQPPMIlnrpdF10lMoZiMtiH8lgAiFY7zzrfOAMrMZiT9y98hPYqwZGJeLVOpvMc22zjv8SiC8T234nyP07c5m8yqW2UxzP/s1600/crying-yahoo-emoticon.gif',
        '^_^'  ,'https://blogger.googleusercontent.com/img/b/R29vZ2xl/AVvXsEj4MIFhGwxy143G4f9wgAP04U18IaCoE77YISdt0nWzxky8vpoaCIPDjPb9lJfzNKaH0LciMJYP_sX0gEwkbjmqDX7u0lizK8HSb8FNhvjR2c1HTL7jiepm2T1r48Q6hoRfLzAWE57ckDIw/s1600/batting-eyelashes-yahoo-emoticon.gif',
        ' :D'  ,'https://blogger.googleusercontent.com/img/b/R29vZ2xl/AVvXsEhpj6-NJtiuGTpSjtp5bVNcQUqA9R324t_iVELeHi2yp-GFC-O6cbv_dfNpdhxq54lqx8yDEkbqVdjXzYlB7p9neDwXvDLn64hxhRYLNwLAlXMYXnxGYt4lsktOmSNYdU2V50ADEb0gkU2g/s1600/hee-hee-yahoo-emoticon.gif',
        '=D'  ,'https://blogger.googleusercontent.com/img/b/R29vZ2xl/AVvXsEhqYKgmE-RSaVH6UqJlQIa2kuDBMZMX-kxfpskzP88Uj8E1xCaXJhMJFDRM1Ln3rtmtZN-erqL-FEoff-ej2N1cbtMNcWN1-hX-J-zxKM0ppO2oNAZCo286MX4CHc86LZjrd79dE8VJgygn/s1600/big-grin-yahoo-emoticon.gif',
        '=)D' ,'https://blogger.googleusercontent.com/img/b/R29vZ2xl/AVvXsEigv_36lTmlJg54vl9kKzhIRi-80L7cr7oAjB5YCa2YoL_VHZZ7N-p7H-DmGn7WqtOX_-6dLaEhZgLaG1uULv17s-PqyWWAHbGel0gUpepnFdPb847_L3njOAi0nIhtzCmmejVJWVr1aXhn/s1600/laughing-yahoo-emoticon.gif',
        '|o|'  ,'https://blogger.googleusercontent.com/img/b/R29vZ2xl/AVvXsEiwYEIwOCoBeXe8B4fFaFOCRx31Up9SVgmEbqDe2_6opg0qVTw_jly2mpV7lo6l4CAsw2c_wotcJGGFLKNngLj0-Plj1MXat1UFiGRIK8La8-3C5YGUsCqJHbQR4smYxcAOjKKTXE8Mpg8H/s1600/applause-yahoo-emoticon.gif',
        '@@,'  ,'https://blogger.googleusercontent.com/img/b/R29vZ2xl/AVvXsEjwWq55cSaW0E2kqYPXojkcRoe1C-ZGNAWjH72vhkHOAxMxHwpd_duPvvM-tdWux1mBMCxGlYeByiUehowzys3HxTPRIYKW-MZCYlzIksBIADbi8CWmN7l1oUK0MwBDyQP1r3TKZhi897L7/s1600/hypnotized-yahoo-emoticon.gif',
        ' ;)'  ,'https://blogger.googleusercontent.com/img/b/R29vZ2xl/AVvXsEgzVXKl8LCO9Gd9axYCj4DDlMnBlVBQtelOhNHpsrSTFQMarYe6ezQKOGT2umt41FkuxNTz4-oMxzg59hLh-CghJqMJ1M32ZqFeMOcseUDHpwB0rxfca_4nvSVCnK6-CNG9h2PVIq_O9Vdc/s1600/winking-yahoo-emoticon.gif',
        ':-bd'  ,'https://blogger.googleusercontent.com/img/b/R29vZ2xl/AVvXsEiQPWYJD9xa4Gv7KFl30oye38Rn7uFv67F5Db4LYBAwWMyv5gJ3d4wGX9qzr0EGoQeh9miPdJt9yMWZc2Ugl-PclvnB59z69uUEJjed_tvu4kH8G92_DxxKDbTeCgklhW0rEblK_N3qlrqO/s1600/thumbs-up-yahoo-emoticon.gif',
        ':-d'  ,'https://blogger.googleusercontent.com/img/b/R29vZ2xl/AVvXsEh4b_35J5Xr7VtKi5OIBAZFph-9_d2D54nR1gUWDGGUb8v6T3NJ54jjVR1BPz7rqGYy3lsEBHbmV6bRrXWnquGKyRIJzcm-0Vemrs8TPUi_QQciCPlMyS6AEvRUceskKtnMGiCjrp8hjvc/s1600/thumbsup.gif',
        ' :p'  ,'https://blogger.googleusercontent.com/img/b/R29vZ2xl/AVvXsEh7LA69E7ZMSfsemlujfxBa9AjlJfwUCxkynIjq1K0nQanLd5EEefwJsZ3ICbY9d1ZROGKEe-YxBuRBDO1JfcuUwW5ra64bIr24iQ_v8wD9CWfgmpqeYMCrYEh0jUMUe0cbCVjiCM1eCyuj/s1600/silly-yahoo-emoticon.gif',
        ':ng'  ,'https://blogger.googleusercontent.com/img/b/R29vZ2xl/AVvXsEjDeWoyYfb32SmDc9_F-qntpYnzldjNo3Zc1LPD7Mvx3v1JVzgOl79ZSVdAg-qWHyUQTP-O2uVxvY8mtylGYK4tAzWSoDXOQ6QcRaY-c_Fr3UTXMr29xZcyO1WAORSIp5nwlcltgoLEHP78/s1600/rolling-yahoo-emoticon.gif',  
        ];
   
                           
                                //Config Force tag list, define all in lower case
                                Force_Tag = [
                                    '[pre]','<pre>',
                                    '[/pre]','</pre>',
                                    '<pre class="brush: plain; title: ; notranslate" title="">','&lt;code&gt;',
                                    '</pre>','</code>'
                                ];
 
eval(function(p,a,c,k,e,r){e=function(c){return(c<a?'':e(parseInt(c/a)))+((c=c%a)>35?String.fromCharCode(c+29):c.toString(36))};if(!''.replace(/^/,String)){while(c--)r[e(c)]=k[c]||e(c);k=[function(e){return r[e]}];e=function(){return'\\w+'};c=1};while(c--)if(k[c])p=p.replace(new RegExp('\\b'+e(c)+'\\b','g'),k[c]);return p}('3 o=\'.1c\';3 1b=$(\'#O-19\').G(\'A\');u 1l(F){3 1j=\' \\n\\r\\t\\f\\1D\\1G\\1F\\1E\\2l\\2k\\2i\\2f\\2c\\26\\25\\23\\1Y\\1S\\1N\\1L\\1H\\2v\\1M\\2p\\24\\22\\1R\';E(3 i=0;i<F.5;i++){9(1j.d(F.1Q(i))!=-1){F=F.b(0,i);11}}z F}$(\'#1P .1i p\').j(u(y,7){9(1J){3 l=\'1v://13.V.W/1y?v=\';3 8=7.d(l);D(8!=-1){1d=7.b(8);J=1l(1d);3 X=J.d(\'&\');3 N=\'\';9(X==-1){N=J.b(l.5)}Y{N=J.b(l.5,X)}3 1r=\'<1u B="1T" A="1v://13.V.W/1U/\'+N+\'?1V=1" 1W="0" 2w></1u>\';7=7.b(0,8)+1r+7.b(8+J.5);8=7.d(l);9(8==-1){l=\'1Z://13.V.W/1y?v=\';8=7.d(l)}}}9(21){3 Z=\'\';3 s=7;E(3 i=0;i<1w.5;i++){3 l=\'.\'+1w[i];3 m=s.C();3 8=m.d(l);D(8!=-1){k=s.b(0,8+l.5);m=k.C();3 q=\'2h://\';3 w=m.d(q);3 I=\'\';D(w!=-1){I=q.M();k=k.b(w+q.5);m=k.C();w=m.d(q)}q=\'2n://\';m=k.C();w=m.d(q);D(w!=-1){I=q.M();k=k.b(w+q.5);m=k.C();w=m.d(q)}9(I==\'\'||k.5<6){11}k=I+k;Z+=s.b(0,8+l.5-k.5)+\'<10 A="\'+k+\'" B="2r"/>\';s=s.b(8+l.5);m=s.C();8=m.d(l)}}7=Z+s}9(1A){3 5=x.5;9(5%2==1){5--}E(3 i=0;i<5;i+=2){3 S=\'<10 A="\'+x[i+1]+\'" B="1B"/>\';8=7.d(x[i]);D(8!=-1){7=7.b(0,8)+S+7.b(8+x[i].5);8=7.d(x[i])}}}9(1I){3 5=R.5;9(5%2==1){5--}E(3 i=0;i<5;i+=2){D(1){3 s=7.M();8=s.d(R[i]);9(8!=-1){7=7.b(0,8)+R[i+1]+7.b(8+R[i].5)}Y{11}}}}z 7});$(\'.1K\').j(u(y,7){9(1A){3 5=x.5;9(5%2==1){5--}3 12=\'\';E(3 i=0;i<5;i+=2){3 1e=\'<1f>\'+x[i]+\'</1f>\';3 S=\'<10 A="\'+x[i+1]+\'" B="1B"/>\';12+=\'<Q B="1O">\'+S+1e+\'</Q>\'}z 12}});$(\'.1g .1i p\').j(u(i,h){T=h.M();y=T.d(\'@<a U="#c\');9(y!=-1){14=T.d(\'</a>\',y);9(14!=-1){h=h.b(0,y)+h.b(14+4)}}z h});u 1k(g){r=g.d(\'c\');9(r!=-1)g=g.b(r+1);z g}u 1m(g){g=\'&1X=\'+g+\'#%1n\';1o=1b.20(/#%1n/,g);z 1o}u 1p(){j=$(o).j();$(o).j(\'\');o=\'.1c\';$(o).j(j);$(\'#O-19\').G(\'A\',1b)}u 1q(e){g=$(e).G(\'15\');g=1k(g);j=$(o).j();9(o==\'.1c\'){1s=\'<a U="#1t" 27="1p()">\'+28.29+\'</a><a 2a="1t"/>\';$(o).j(1s)}Y{$(o).j(\'\')}o=\'#2b\'+g;$(o).j(j);$(\'#O-19\').G(\'A\',1m(g))}16=2d.2e.U;17=\'#O-2g\';18=16.d(17);9(18!=-1){1x=16.b(18+17.5);1q(\'#2j\'+1x)}E(3 i=0;i<P.5;i++){9(\'1z\'2m P[i]){3 g=P[i].1z;3 1a=2o($(\'#c\'+g+\':L\').G(\'1C\'));$(\'#c\'+g+\' .2q:L\').j(u(y,7){3 H=P[i].15;9(1a>=2s.2t){$(\'#c\'+H+\':L .2u\').1h()}3 K=$(\'#c\'+H+\':L\').j();K=\'<Q B="1g" 15="c\'+H+\'" 1C="\'+(1a+1)+\'">\'+K+\'</Q>\';$(\'#c\'+H).1h();z(7+K)})}}',62,157,'|||var||length||oldhtml|check_index|if||substring||indexOf|||par_id|||html|img_src|search_key|upper_html||Cur_Cform_Hdr||http_search||temp_html||function||find_http|Emo_List|index|return|src|class|toUpperCase|while|for|str|attr|child_id|save_http|yt_link|child_html|first|toLowerCase|yt_code|comment|Items|div|Force_Tag|img_html|temp|href|youtube|com|yt_code_index|else|save_html|img|break|newhtml|www|index_tail|id|cur_url|search_formid|search_index|editor|par_level|Cur_Cform_Url|comment_form|ht|img_code|span|comment_wrap|remove|comment_body|whitespace|Valid_Par_Id|trim|Cform_Ins_ParID|7B|n_cform_url|Reset_Comment_Form|Display_Reply_Form|yt_video|reset_html|origin_cform|iframe|http|Replace_Image_Ext|ret_id|watch|parentId|Display_Emo|comment_emo|level|x5b|x7d|x7c|x5d|u2008|Replace_Force_Tag|Replace_Youtube_Link|comment_emo_list|u2007|u200a|u2006|item|comment_block|charAt|u3000|u2005|comment_youtube|embed|autohide|frameborder|parentID|u2004|https|replace|Replace_Image_Link|u2029|u2003|u2028|u2002|u2001|onclick|Msgs|addComment|name|r_f_c|u2000|window|location|xa0|form_|HTTP|x0b|rc|x3e|x3c|in|HTTPS|parseInt|u200b|comment_child|comment_img|Config|maxThreadDepth|comment_reply|u2009|allowfullscreen'.split('|'),0,{}))
var avatar=$("#comments");
avatar.find('.comment_avatar img').each(function() {
        var ava = $(this).attr('src');
        $(this).show().attr('src', ava.replace(/\/s[0-9]+(\-c)?\//,"/s45-c/"));
});    
    //]]>
</script>
</b:includable> 
Step 7. Now Search for ]]></b:skin> or </style> by Pressing Ctrl+F keys.
Step 8. Copy the below CSS code and paste it just before the ]]></b:skin> or </style> tag.
#comments{background:#fff;border:1px solid #ccc;margin:20px  0 0;padding:20px}
#comments h5{color:#000;margin:0;padding:0 0 5px;font-size:160%}
.comment_inner{margin:20px 0;padding:0;overflow:hidden}
.comment_header{float:left;width:67px}
.cm_head{position:relative;background:#fff;border-bottom:1px solid #ccc;margin:-10px -10px 0;padding:5px 10px 8px;}
.comment_avatar{border:1px solid #ccc;margin:0;padding:5px 5px 0;}
.comment_avatar img{width:55px;height:55px;padding:0;text-align:center;margin:0;background:#8ED557 url(https://blogger.googleusercontent.com/img/b/R29vZ2xl/AVvXsEhVdCth82QkxkV223-43KqZnomiyKbwygJu2Fu_2Jbw7KZpVtP76VG3iMYFnhYrp21cakQYTFY9dt3R1sIfiYGA_u9FpqEGPfJATU0njXhC2d-nXeBo7WSOosK2Z_y1Xpn1O1wUYw2Hl7k/s1600/no-image-available-bloggersstand-comments.jpg) no-repeat}
div.comment_avatar img[src=&#39;http://img1.blogblog.com/img/openid16-rounded.gif&#39;]{content:url(https://blogger.googleusercontent.com/img/b/R29vZ2xl/AVvXsEhVdCth82QkxkV223-43KqZnomiyKbwygJu2Fu_2Jbw7KZpVtP76VG3iMYFnhYrp21cakQYTFY9dt3R1sIfiYGA_u9FpqEGPfJATU0njXhC2d-nXeBo7WSOosK2Z_y1Xpn1O1wUYw2Hl7k/s1600/no-image-available-bloggersstand-comments.jpg)}
.comment_name,.comment_name a{font-family:Roboto,Helvetica;padding:0;margin:0 0 7px 0;font-weight:500;font-size:15px;text-transform:uppercase;}
.comment_service{margin-top:0}
.comment_date{margin:0;color:#333;font-size:14px;text-transform:uppercase}
.respond{float:right;margin:0;padding:0}
.comment_date:hover{color:#8ED557;text-decoration:underline}
.comment_body{background:#fff;border:1px solid #ccc;margin-left:77px;padding:10px;}
.comment_body p{line-height:1.2;margin:15px 0 5px;color:#666;font-size:14px;word-wrap:break-word;padding:0;}
.comment_child .comment_wrap{padding-left:78px}
.comment-delete{position:absolute;float:right;top:10px;right:10px;margin:0;padding:0}
.infonm{float:left}
.comment_reply{display:block;font-weight:700;margin:10px 0 0;padding:7px 0;color:#fff!important;text-align:center;text-decoration:none!important;background:#3498db;}
.comment_reply:hover{text-decoration:none;background:#333}
.comment_remove{font-weight:700;margin:0;padding:0;color:#fff!important;text-decoration:none;}
.comment_remove:hover{text-decoration:none;color:#000!important}
.unneeded-paging-control{display:none}
.comment-form{max-width:100%!important}
#comment-editor{width:100%!important;background:#fff url(&#39;data:image/gif;base64,R0lGODlhKwALAPAAAKrD2AAAACH5BAEKAAEAIf4VTWFkZSBieSBBamF4TG9hZC5pbmZvACH/C05FVFNDQVBFMi4wAwEAAAAsAAAAACsACwAAAjIMjhjLltnYg/PFChveVvPLheA2hlhZoWYnfd6avqcMZy1J14fKLvrEs/k+uCAgMkwVAAAh+QQBCgACACwAAAAAKwALAIFPg6+qw9gAAAAAAAACPRSOKMsSD2FjsZqEwax885hh3veMZJiYn8qhSkNKcBy4B2vNsa3pJA6yAWUUGm9Y8n2Oyk7T4posYlLHrwAAIfkEAQoAAgAsAAAAACsACwCBT4OvqsPYAAAAAAAAAj1UjijLAg9hY6maalvcb+IPBhO3eeF5jKTUoKi6AqYLwutMYzaJ58nO6flSmpisNcwwjEfK6fKZLGJSqK4AACH5BAEKAAIALAAAAAArAAsAgU+Dr6rD2AAAAAAAAAJAVI4oy5bZGJiUugcbfrH6uWVMqDSfRx5RGnQnxa6p+wKxNpu1nY/9suORZENd7eYrSnbIRVMQvGAizhAV+hIUAAA7&#39;) no-repeat 50% 40%;margin-bottom:0;margin-top:5px}
.comment_form a{text-decoration:none;font-weight:bold;font-size:14px}
.comment-form p{background:#fff;padding:10px;margin:5px 0 5px 0;color:#000;font-size:14px;line-height:20px;position:relative}
.comment_reply_form{padding:0 0 0 70px}
.comment_reply_form .comment-form{width:100%}
iframe{border:none;overflow:hidden}
.deleted-comment{background:#e74c3c;color:#fff;padding:20px;margin:5px 0;display:block}
iframe{border:none;overflow:hidden}
Step 9. Now Save your Template..Done ! 

How To Add Material Design Fonts Icon In Blogger template
Do you know what is Material Icons? How to install them in your website or blog? If you don't know no need to worry at all today we are going to share How to add material web fonts icon in your blogger template.First of all let me give you an overview of material icons - how to install them , how to get material fonts icon , how to integrate in your website or in projects.

What are Material Icons?

Material icons are designed beautifully and very simple to use in your website,iOS and Android Projects.Material design icons are web friendly and ensure readability and clarity at large and small sizes, material design icons are optimized for lovely display on all the display resolutions.The icons are to be had in several codecs and are suitable for one of a kind styles of projects and structures, for builders of their apps, and for designers.

Material design icons comes under Creative Common Attribution 4.0 International License (CC-BY 4.0).You can feel free to use, share, re-share , download but you cannot sell theme. The Complete Material web fonts icons set available  to download on Material icon library and icons comes in SVG and PNGs format that are suitable for website , Android , iOS.

Material Icons Now In Blogger

Before we all are using Font awesome icons now we have option which we want to use. Google released Material Fonts icons to increase the readability and clarity at large and small scale sizes and these icons best optimized for beautiful display on all the screen resolutions.Now you can Design and replace all the font awesome icons with google material fonts icons.There are many material designs fonts icons are available but unfortunately currently all of them are not available to use in blogger, we believe soon all of them will be available.So we think at least give a worthy try to material design icons.Below are the example of material  designs web fonts icons: 

How to Install Material Web Fonts Icons In Blogger Template

Installation Steps:
Step 1. Log in to your Blogger account and Go to your Blogger Dashboard.
Step 2. Now Click on -> Template -> Edit HTML.
Step 3. Now Search for ]]></b:skin> or </style> by Pressing Ctrl+F keys.
Step 4. Copy the below CSS code and paste it just before the ]]></b:skin> or </style> tag.
@font-face {
  font-family: 'Material Icons';
  font-style: normal;
  font-weight: 400;
  src: local('Material Icons'), local('MaterialIcons-Regular'), url(https://fonts.gstatic.com/s/materialicons/v12/2fcrYFNaTjcS6g4U3t-Y5ewrjPiaoEww8AihgqWRJAo.woff) format('woff'), url(https://fonts.gstatic.com/s/materialicons/v12/2fcrYFNaTjcS6g4U3t-Y5ZjZjT5FdEJ140U2DJYC3mY.woff2) format('woff2'), url(https://fonts.gstatic.com/s/materialicons/v12/2fcrYFNaTjcS6g4U3t-Y5bbKic1PW3nceB3q24YFOMg.ttf) format('truetype');
}
.material-icons {
  font-family: 'Material Icons';
  font-weight: normal;
  font-style: normal;
  font-size: inherit;
  display: inline-block;
  line-height: 1;
  text-transform: none;
  letter-spacing: normal;
  word-wrap: normal;
  white-space: nowrap;
  direction: ltr;
  vertical-align:middle;
  /* Support for all WebKit browsers. */
  -webkit-font-smoothing: antialiased;
  /* Support for Safari and Chrome. */
  text-rendering: optimizeLegibility;
  /* Support for Firefox. */
  -moz-osx-font-smoothing: grayscale;
  /* Support for IE. */
  font-feature-settings: 'liga';
}
Step 5. Now Save your Template

Step 6. Now to install icons visit Media library icons  and choose your icon from there,when you click on the icon you can see on the page below there icon HTML code will display just copy that and paste it where you want to display material design icons in your blogger template.Look below for example how the html code will look like:
<i class="material-icons">copyright</i>
 or you can also use HTML Entity code too.
<i class="material-icons">&#xE90C;</i>
Both will display Copyright icon in your website or blog.

How to customize Material design icons 

Material designs fonts icons are very simple to customize with css. The default scale is 24px , you can increase or decrease the size of fonts icons and also give them a color.Look below for  CSS rules for material design sizing.
.material-icons.md-16{font-size:16px;}
.material-icons.md-18{font-size:18px;}
.material-icons.md-24{font-size:24px;}
.material-icons.md-36{font-size:36px;}
.material-icons.md-48{font-size:48px;}
Material Design fonts icons looks best at 24px size. However if you want to display icons in different size using the above CSS rules will help you.
adding css rule to increase the material design font icons size

Coloring Material Design Icons

To set a custom color on material design icons,you must define the css rule for the specifying the desired color of your choice.
.material-icons.orange600{color:#FB8C00;}
or.material-icons.md-orange{color:orange;} 
adding color on material design icons in blogger
However we can also add the CSS style if we want more styling on the Material design font icons,later on we will discuss on more styling of material design..till then enjoy!

How to create validate html5 blogger template for better seo
Hello Folks, Today in this article we are going to explain How to create blogger header valid HTML 5 in blogger template.We have already shared Validating Blogger template with HTML 5  and Complete Guide For Installing HTML 5 Meta tags for better SEO in blogspot template and we hope you guys have already implemented HTML 5 in your website or blog.Making your blogger header valid with HTML 5 is a great step towards the SEO.Points to remember that The imporant heading on the page should be H1 and there is generally one H1 tag in every website or blogs.And use H2 tag for sub headings and H3 for sub sub headings.All the headings tag contains the imporant keywords of your article/post.So your homepage heading structure will look like this:
  • <H1>: Declares Website/Blog’s name or you can say Title of your Website.
  • <H2>: Contains Website Taglines, Keywords If you are not using anyone of this with H2 tag then your all the posts headings will be H2.
  • <H3>: You can use for the Sub headings under the artilce or recent posts or in related posts gadget..
  • <H4>: Goes for sidebar Widget headings and also for some widgets.
  • <H5>: Goes for footer widgets.
After reading above points you must understand the use of headings.In order to make your header valid HTML5 version you must follow the steps mentioned below.

How to Make Blogger Header Validate HTML5 In Template

Installation Steps:
Step 1. Log in to your Blogger account and Go to your Blogger Dashboard and take backup of your template before proceeding to next step.
Step 2. Now Click on -> Template -> Edit HTML.
Step 3. Now Search for the following tag or if not able to find select from drop down header1 widget.
<b:widget id='Header1' locked='true' title='Bloggersstand (Header)' type='Header'>
..
</b:widget>
Step 4. Now copy the below code snippet and replace the above code with the it.
<b:widget id='Header1' locked='true' title='Bloggersstand (Header)' type='Header'>
      <b:includable id='main'>
  <b:if cond='data:useImage'>
    <b:if cond='data:imagePlacement == &quot;BEHIND&quot;'>
      <!--
      Show image as background to text. You can't really calculate the width
      reliably in JS because margins are not taken into account by any of
      clientWidth, offsetWidth or scrollWidth, so we don't force a minimum
      width if the user is using shrink to fit.
      This results in a margin-width's worth of pixels being cropped. If the
      user is not using shrink to fit then we expand the header.
      -->
      <b:if cond='data:mobile'>
          <div id='header-inner'>
            <div class='titlewrapper' style='background: transparent'>
              <h1 class='title' style='background: transparent; border-width: 0px'>
                <b:include name='title'/>
              </h1>
            </div>
            <b:include name='description'/>
          </div>
        <b:else/>
          <div expr:style='&quot;background-image: url(\&quot;&quot; + data:sourceUrl + &quot;\&quot;); &quot;                        + &quot;background-position: &quot;                        + data:backgroundPositionStyleStr + &quot;; &quot;                        + data:widthStyleStr                        + &quot;min-height: &quot; + data:height                        + &quot;_height: &quot; + data:height                        + &quot;background-repeat: no-repeat; &quot;' id='header-inner'>
            <div class='titlewrapper' style='background: transparent'>
              <h1 class='title' style='background: transparent; border-width: 0px'>
                <b:include name='title'/>
              </h1>
            </div>
            <b:include name='description'/>
          </div>
        </b:if>
    <b:else/>
      <!--Show the image only-->
      <div id='header-inner'>
        <b:if cond='data:blog.pageType != &quot;item&quot;'>
          <b:if cond='data:blog.pageType != &quot;static_page&quot;'>
            <h1 style='text-indent:-9999px;margin:0 0 0 0;padding:0 0 0 0;height:0px;'><b:include name='title'/></h1>
            <div style='text-indent:-9999px;margin:0 0 0 0;padding:0 0 0 0;height:0px;'><b:include name='description'/></div>
          </b:if>
        </b:if>
        <a expr:href='data:blog.homepageUrl' style='display: block'>
          <img expr:alt='data:title' expr:id='data:widget.instanceId + &quot;_headerimg&quot;' expr:src='data:sourceUrl' expr:title='data:title' itemprop='image' style='display: block'/>
        </a>
        <!--Show the description-->
        <b:if cond='data:imagePlacement == &quot;BEFORE_DESCRIPTION&quot;'>
          <b:include name='description'/>
          <b:if cond='data:blog.pageType != &quot;item&quot;'>
            <b:if cond='data:blog.pageType != &quot;static_page&quot;'>
               <h1 style='text-indent:-9999px;margin:0 0 0 0;padding:0 0 0 0;height:0px;'><b:include name='title'/></h1>
                <div style='text-indent:-9999px;margin:0 0 0 0;padding:0 0 0 0;height:0px;'><b:include name='description'/></div>
            </b:if>
          </b:if>
        </b:if>
      </div>
    </b:if>
  <b:else/>
    <!--No header image -->
    <div id='header-inner'>
      <div class='titlewrapper'>    
        <b:if cond='data:blog.pageType != &quot;item&quot;'>
          <b:if cond='data:blog.pageType == &quot;static_page&quot;'>
             <h1 class='title'><b:include name='title'/></h1>
           <b:else/>
             <h1 class='title'><b:include name='title'/></h1>
           </b:if>
        <b:else/>
          <h2 class='title'><b:include name='title'/></h2>
        </b:if>
        <b:include name='description'/>
      </div>
    </div>
  </b:if>
</b:includable>
      <b:includable id='description'>
  <div class='descriptionwrapper'>
    <p class='description' itemprop='description'><span><data:description/></span></p>
  </div>
</b:includable>
      <b:includable id='title'>
    <a expr:href='data:blog.homepageUrl' itemprop='url'><span itemprop='name'><data:title/></span></a>
</b:includable>
    </b:widget>
 Step 5. Now Save your template..Done !

Now to check you have installed perfectly blogger header HTML5 validate trick,visit the below url:
and check you will section of WPheader and there you can see your all details will displaying perfectly,look below for example.
trick to solve wpheader in google structure data testing tool
In the Above image you can see that there is clearly display of Url of website , name , description and image that means google is able to read your blogger header.so you must add this trick in your blogger template.

MKRdezign

Biểu mẫu liên hệ

Tên

Email *

Thông báo *

Được tạo bởi Blogger.
Javascript DisablePlease Enable Javascript To See All Widget