Demo Các hướng dẫn thủ thuât trên Blogsopt

tháng 4 2016
Add-on Wordpress Plugin Adsense Backlinks Best Blogger Template Blog And Magazine Wordpress Themes Blogger Gadgets Blogger Plugins Blogger SEO Blogger SEO Tips Blogger Templates Blogger Tricks Blogger Tutorials Blogger Widgets Blogging Blogspot Series BlueHost Business City CodeCanyon Computer Corporate Wordpress Theme Creative Creative Market Creative Wordpress Theme CSS Cuisines Destination Directory & Listings Domain eCommerce WordPress Plugin eCommerce Wordpress Theme Extensions Pack Facebook Fashion FontAwesome Foods Gallery Google Google AdSense Google Webmaster Tools Hack Host Hosting HTML Hướng dẫn JavaScript Magazine Blogger Template Make Money Online Marketing Material Design Membership Miscellaneous MultiMedia Blogger Templates Multipurpose Blogger Template Music MySQL News News Blogger Template People Phần mềm Phones Photography PHP Portfolio Premium Blogger Templates Productivity Responsive Blogger Template Rss Subscribe Widget SEO SEO Optimized Blogspot Templates SEO Tips SEO Wordpress SEO Wordpress Tips Server Social Media Share Button Social Subscription Widget Software Soliloquywp Speaker Tablets Tài liệu Tech Technology Template Blogspot TheEventsCalendar Thủ Thuật Thủ Thuật Blogger Thủ Thuật Máy Tính Tin tức Tool Travel Trends Utilities WordPress Plugin Video Wedding Widgets WooCommerce Wordpress Plugin Wordpress Seo Wordpress ThemeForest Themes Wordpress Themes Wordpress Tricks Wordpress Tutorials World News WP Plugins WP Sliders Yahoo Youtube

Free Download Axact V2.1 - Responsive Magazine Blogspot theme blogger
Axact is a modern, clean, responsive and flat Blogger template suitable for magazine, news, sports, tech, games and multipurpose blog. Axact is designed with flexible approach lets you to easily change the color, font size and other customization that you can made through blogger template designer.
Axact not only excels at front-end usability and user experience, but the admin back-end is very easy to use with full instructions in the documentation in the package. You can easily drag and drop widgets and add any widgets supported by this theme from the documentation. The detailed doc lets you to set up your blog fast. The main features includes SEO, Fast loading, Ajax search result, 5+ unique homepages, pro shortcodes and many more.

Features:

  • post pagination
  • Image gallery
  • Custom contact form Widget
  • 5+ Homepages
  • Detailed Docs
  • Support
  • Tabs and accordion
  • Button styles
  • Alert Boxes
  • code boxes
  • Responsive Design For mobile and tablet devices
  • PowerFull Admin Panel
  • Popup contact form
  • Multiple layout styles for widgets
  • Custom search box with ajax result
  • Unlimited Colors & Fonts
  • Fully customizable Design
  • Search Engine Optimized (SEO)
  • 10+ Home Layout Boxs Style with shortcodes
  • 3 Column Footer Area
  • Footer about us and email widget
  • Support Facebook Open Graph & Twitter Cards
  • Adsense Ready
  • Retina Ready
  • Drag and Drop widget Support
  • jQuery and CSS3 Effects
  • Social Counter
  • Multi Level Dropdown Menu
  • Posts navigation with next and previous post
  • Attractive related post design
  • Awesome footer style with multiple widget designs
  • Blogger Template designer supported
  • Unlimited customization options (colors, fonts, template skins (light and dark etc.)
  • Minimized HTML, CSS and Jquery
  • Fast Loading in all web browsers
  • Custom email widget design
  • More then twenty the most trending social Media icons for follow and sharing purposes with different styles (flat, rounded and rotating etc.)
  • The awesome mega menu designed with CSS3 and HTML.
  • Cross Browser Compatible
  • Font Awesome Icons Integration
  • Full width featured carousel Slider below the mega menu or can be placed anywhere in the widget section
  • High quality image thumbnails
  • Blogger threaded Comments system with cool design
  • Shortcodes ready for buttons and other UI elements
  • and more..

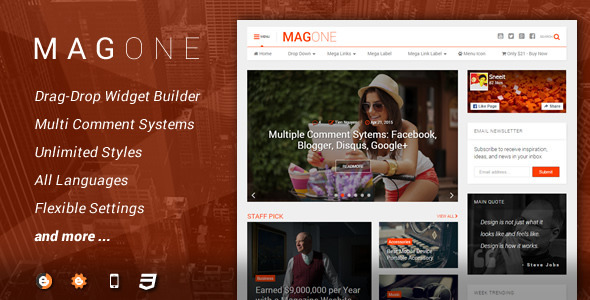
MagOne latest new version 4.2.1 Responsive Newspaper & Magazine Template
MagOne template is flexible and responsive magazine template for Blogger / Blogspot websites. Drag and drop to build a magazine website in minute.

Main Features:

  • Drag and Drop Widget Builder: only need to change parameters then move widgets to any where to make any layout you want.
  • Flexible Menu Navigation: supports drop-down, link group mega, label content mega, and icons.
  • Responsive: passed all Goolge mobile friendly tests. Working well 100% with any mobile and tablet devices.
  • Multiple Comment Systems: Facebook, Google+, Blogger and Disqus comment systems are all ready to work.
  • Custom Archive Page Designs: pick any design for label / search / archive pages as you want with professional navigation buttons.
  • Super Mega Menu: support Ajax content, group links, drop down, icons and open new window feature.
  • Floating Menu: You can configure to show sticky menu when scroll up or down or both.
  • Sticky Sidebar: Optimize your earning for sidebar advertisement.
  • Shortcode Ready: you can create content very easily with a lot of ready shortcodes.
  • Custom Post Title Design: easy changing your post main title design with default editor of Blogger.
  • Support Sub Post Title: you can add subtitle of post and pick custom style for it.
  • Smart Breadcrumb: not similar breadcrumb of other templates, our breadcrumb will show labels as exactly order automatically.
  • Widgets Ready: template has a lot of built-in widgets: article widgets (slider, sticky, complex, carousel, one column, two columns, three columns, blogging, left and right), quote image widgets, flexible popular widgets.
  • Post Pagination: you can split long post content to pages with simple shortcode.
  • Reactions, Locations, Share Buttons, Author Box, Related Posts are all ready: we don’t miss any thing for your article content, just focus to your content, we will handle your site interface.
  • Fully Template Designer: support most of features from Blogger advance customizer. This template has flexible width also.
  • Template Options: have friendly UI for changing template options easily through SpotSettings tool.
  • Multilingual Ready: template supports SpotLingo to translate to any languages easily and compatible with any RTL languages.
  • Support Service: well documentation and have many ways to support (remote desktop, login as member, email directly).

Update: Version 4.2.1 – April 20, 2016
  • - Fixed: Popular post thumbnails not display properly
  • - Fixed: Archive page not load posts
  • - Fixed: resizer not work with firefox, it can not veritical middle

Download Magone V4.2.1 Blogger Template Terms and Conditions:

We are providing Magone 4.2.0 Responsive Magazine Blogger Template absolutely free. To get the template, please show support to the bloggersstand community by liking or following us on the social media. This will help us to provide an awesome experience and more facilities for our users. Just connect with us on any kind of social media and confirm the same with a comment below including your email information or you can use contact us page directly. We will send you the template as soon as we are happy with your commitment with us. So what are you waiting for, join us for an awesome blogging experience.

How To Add 4 In One Box Social Media Widget In Blogger template
Hello folks, today in this article we are going to explain How to add 4 in one boxed style social media widget in blogger template.This widget is very useful for the any website or blog.In box social media profile gadget we have added three social media Facebook , twitter and google plus and additionally we have added section for join our site plugin to follow the blogspot website.Box 4 in one social media is very light weight widget with the integration of the font awesome icons on it.We have used CSS for styling and html for the box.Box social media widget will surely going to enhance the look of any website.In order to get the 4 in one boxed social media widget follow the steps mentioned below.
DEMO

How to Install 4 in one box social media widget in blogger template

Installation Steps:

Step 1. Log in to your Blogger account and Go to your Blogger Dashboard.

Step 2. Now Click on  Template -> Edit HTML.

Step 3. Now Search for </head> tag by Pressing Ctrl+F keys.

Step 4. Copy the below Fontawesome CSS stylesheed and paste it just before the </head> tag.( If you already added fontawesome stylesheet then skip 4th step.)

<link href='//maxcdn.bootstrapcdn.com/font-awesome/4.5.0/css/font-awesome.min.css' rel='stylesheet'/>
Step 5. Now Search for ]]></b:skin> or </style> by Pressing Ctrl+F keys.
Step 6. Copy the below CSS code and paste it just before the ]]></b:skin> or </style> tag.

#HTML20
.bsdbox-info h4 {
background: transparent;
position: relative;
padding: 0;
margin: 0;
border: 0;
text-align: center;
font-size: 110%
}

.bsdbox-img {
position: relative;
max-height: 135px;
overflow: hidden
}

.bsdbox-img img {
max-width: 100%;
width: 100%;
transition: all .6s;
}

.bsdbox-img:hover img {
transform: scale(1.2) rotate(-9deg)
}

.bsdbox-img:before {
content: '';
background: rgba(0, 0, 0, 0.2);
position: absolute;
top: 0;
left: 0;
right: 0;
bottom: 0;
z-index: 2;
transition: all .3s
}

.bsdbox-img:hover:before {
background: rgba(0, 0, 0, 0.5);
}

.joinfloat-img {
width: 56%;
position: absolute;
top: 36%;
bottom: 36%;
left: 22.6%;
z-index: 4
}

.bsdbox-float {
text-align: center;
display: table;
width: 100%;
height: 100%
}

.bsdbox-float a {
background: transparent;
color: #37B185;
padding: 8px 14px;
z-index: 2;
display: table-cell;
width: 100%;
font-size: 90%;
text-transform: uppercase;
vertical-align: middle;
border: 1px solid #37B185;
border-radius: 4px;
transition: all .3s
}

.bsdbox-float:hover a {
background: #37B185;
color: #fefefe;
border-color: transparent;
}

.bsdbox-float a i {
font-weight: normal;
margin: 0 6px 0 0
}

.bsdbox-wrap {
display: block;
margin: 14px auto;
position: relative;
}

.bsdbox-wrap .bsdextend {
width: 100%;
display: block;
}

.bsdextend {
text-align: center;
font-size: 17px
}

.bsdextend .bsdbox-icon {
display: inline-block;
border: 0;
margin: 0;
padding: 0;
width: 32%;
}

.bsdextend .bsdbox-icon a {
background: #768187;
display: inline-block;
font-weight: 410;
color: #fefefe;
padding: 0 12px;
line-height: 32px;
border-radius: 4px;
font-size: 11px;
width: 100%;
}

.bsdextend .bsdbox-icon i {
font-family: fontawesome;
margin: 0 4px 0 0
}

.bsdbox-icon.facebook a {
background: #3b5998
}

.bsdbox-icon.twitter a {
background: #19bfe5
}

.bsdbox-icon.circle a {
background: #d64136
}

.bsdbox-icon.facebook a:hover,
.bsdbox-icon.twitter a:hover,
.bsdbox-icon.circle a:hover {
background: #415471
}

.bsdextend .bsdbox-icon:hover a,
.bsdextend .bsdbox-icon a:hover {
color: #fefefe;
}

.bsdbox-info {
margin: 11px 0 0 0;
font-size: 12px;
text-align: center;
}

.bsdbox-info p {
margin: 6px 0
}

.bsdbox-info h4 {
position: relative;
margin-bottom: 11px;
font-size: 15px;
text-transform: uppercase;
color: #37B185;
font-weight: 600
}

.bsdbox-info h4 span {
position: relative;
display: inline-block;
padding: 0 11px;
margin: 0 auto;
}

.bsdbox-info h4:before,
.bsdbox-info h4:after {
position: absolute;
top: 52%;
overflow: hidden;
width: 50%;
height: 1px;
content: '\a0';
background-color: rgba(0, 0, 0, 0.07);
}

.bsdbox-info h4:before {
margin-left: -50%;
text-align: right;
}

Step 7. Now copy the below HTML code and paste it between <body> - </body> tag.

<b:widget id='HTML20' locked='false' title='Join us' type='HTML' visible='true'>
<b:includable id='main'>
<!-- only display title if it's non-empty -->
<b:if cond='data:title != &quot;&quot;'>
<h2 class='title'><data:title/></h2>
</b:if>
<div class="widget-content">
<div class="author-sidebar">
<div class='inner_wrapper'>
<div class='bsdbox-img'>
<img alt='Bloggersstand' class='img-responsive' height='auto' src='https://blogger.googleusercontent.com/img/b/R29vZ2xl/AVvXsEhkXW_gXZ6XOp49aq8Ldq_WRoKqndjGpN9Cvdad3ENCSE08GY58z3OEcs6XyGTllro2Ei9DHyebrzy-YtrQBfV-yPaIocS4I6uZOQ-x9Uzy7Ef_UtUku84Z0WkW8Iah-JWN439TxasUnLE/s1600/subscribe+to+bloggersstand+feed.jpg' title='Bloggersstand' width='300' ></img>
<div class='joinfloat-img'><span class='bsdbox-float'><a href='https://www.blogger.com/follow-blog.g?blogID=8771880403313863692' rel='nofollow' target='_blank' title='Join Our Site'><i class='fa fa-laptop'></i> Join Our Site</a></span></div>
</div>
</div>
<div class='bsdbox-info'>
<h4><span>Bloggersstand.com</span></h4>
<p>Micro Blogging + SEO Tips + Make Money</p>
</div>
<div class='bsdbox-wrap'>
<ul class='bsdextend'>
<li class='bsdbox-icon facebook'>
<a href='https://www.facebook.com/bloggersstand' target='_blank' title='Follow us on Facebook'><i class='fa fa-facebook fa-fw'></i>Follow Us</a>
</li>
<li class='bsdbox-icon twitter'>
<a href='https://twitter.com/bloggersstand' target='_blank' title='Follow us on Twitter'><i class='fa fa-twitter fa-fw'></i>Follow Us</a>
</li>
<li class='bsdbox-icon circle'>
<a href='https://plus.google.com/+Bloggersstand' rel='nofollow' target='_blank' title='Follow us on Google+'><i class='fa fa-google-plus fa-fw'></i>Circle Us</a>
</li>
</ul>
</div>
</div>
</div>
</b:includable>
</b:widget>

Customization:
Remove social media profile name bloggersstand with your username.
To change inside title of the widget, please replace bloggersstand.com with your title.
To change the description or text inside the widget, replace blogging + ...</p> with your text.
To change the background image of the box style widget ,replace the image url.

Step 8. Now Save your template..Done !

add install new latest recent post auto scroll breaking trending now news widget in blogger
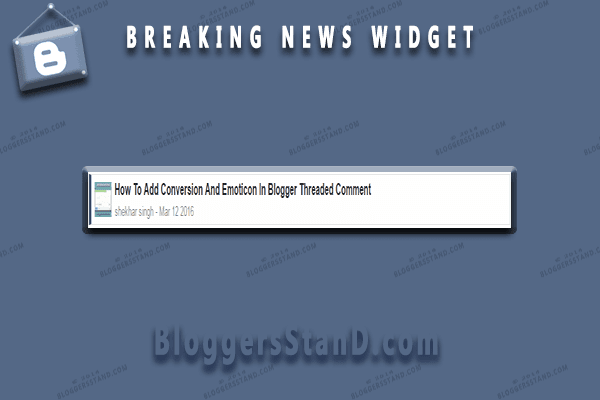
In previous post we have talked about Adding Responsive Breaking News Widget and Stylish Trending Now Gadget In Blogger Template.Once again today in this article we are going to explain How to Create 2016 Thumbnail Breaking News plugin inside blogger template.In this gadget tool you can display latest/recent article updates from your blogger website or blog.New posts updates will slide smoothly to upside with the thumbnail of the article and also includes author name with the publish date beside the author name.New Breaking news widget 2016 will surely going to suits your website design/niche.You can change the color of the gadget.We have used CSS for styling the trending now gadget and java script too.In order to get breaking news widget below the menu bar follow the steps mentioned below.
DEMO

How to Add New 2016 Breaking News Widget inside blogger template

Installation Steps:
Step 1. Log in to your Blogger account and Go to your Blogger Dashboard.
Step 2. Now Click on  Template -> Edit HTML.
Step 3. Now Search for ]]></b:skin> or </style> by Pressing Ctrl+F keys.
Step 4. Copy the below CSS code and paste it just before the ]]></b:skin> or </style> tag.
 
/* CSS Breaking News Ticker */
.bsd-ticker{display:block;text-align:center;margin:0 20px 20px 20px;padding:3px;background:#fefefe;border:1px solid rgba(0,0,0,0.1);border-left:5px solid #415471}
.bsd-ticker>span{display:inline-block;background:#415471;padding:0;font:700 12px 'roboto',sans-serif}
.bsd-ticker>span>a{color:#222;text-decoration:none}
#ticker{height:46px;overflow:hidden;background:#ffffff;text-align:left}
#ticker ul{padding:0;margin:0;list-style:none}
#ticker ul li{height:46px;white-space:nowrap}
#ticker ul li img{float:left;width:36px;height:36px;margin:5px 7px 5px 5px}
#ticker ul li h3{margin:0;font:700 16px 'roboto',sans-serif}
#ticker ul li h3 a{color:#666;text-decoration:none;line-height:26px!important}
#ticker ul li .authorticker{font:400 12px 'roboto',sans-serif;line-height:21px!important;color:#666}

Step 5. Now Search for the closing tab </body> and add the below java script just above/before the </body> tag. 

<script type='text/javascript'>
//<![CDATA[
// 2016 Breaking News ticker by http://www.bloggersstand.com
function getauthorundefinedt){forundefinedvar e=0;e<t.length;e++)var i=t[e].name.$t;return i}function getmetaundefinedt){var e=[];e[1]="Jan",e[2]="Feb",e[3]="Mar",e[4]="Apr",e[5]="May",e[6]="Jun",e[7]="Jul",e[8]="Aug",e[9]="Sep",e[10]="Oct",e[11]="Nov",e[12]="Dec";var i=t.substringundefined0,4),a=t.substringundefined5,7),n=t.substringundefined8,10),r=e[parseIntundefineda,10)]+" "+n+" "+i;return r}function bloggersstandtickerundefinedt){var e=document.querySelectorundefined"#ticker"),i=t.feed.entry,a="<ul id='ticket-wrapper-inner'>";ifundefinedi){forundefinedvar n=0;n<i.length;n++){forundefinedvar r=i[n],s=0;s<r.link.length;s++)ifundefined"alternate"==r.link[s].rel){var l=r.link[s].href;break}try{var o='<img src="'+r.media$thumbnail.url+'"/>'}catchundefinedt){var o=""}var u=r.title.$t,c=getauthorundefinedr.author),d=getmetaundefinedr.published.$t);a+="<li>"+o+'<h3><a href="'+l+'">'+u+'</a></h3><div class="authorticker"><span>'+c+"</span> - <span>"+d+"</span></div></li>"}a+="</ul>",e.innerHTML=a}$undefined"#ticker").bsdtickerundefined)}!functionundefinedt){var e={speed:700,pause:4e3,showItems:1,mousePause:!0,height:0,animate:!0,margin:0,padding:0,startPaused:!1},i={moveUp:functionundefinedt,e){i.animateundefinedt,e,"up")},moveDown:functionundefinedt,e){i.animateundefinedt,e,"down")},animate:functionundefinede,i,a){var n=e.itemHeight,r=e.options,s=e.element,l=s.childrenundefined"ul"),o="up"===a?"li:first":"li:last";s.triggerundefined"bsdticker.beforeTick");var u=l.childrenundefinedo).cloneundefined!0);ifundefined0<r.height&&undefinedn=l.childrenundefined"li:first").heightundefined)),n+=r.margin+2*r.padding,"down"===a&&l.cssundefined"top","-"+n+"px").prependundefinedu),i&&i.animate){ifundefinede.animating)return;e.animating=!0,l.animateundefined"up"===a?{top:"-="+n+"px"}:{top:0},r.speed,functionundefined){tundefinedl).childrenundefinedo).removeundefined),tundefinedl).cssundefined"top","0px"),e.animating=!1,s.triggerundefined"bsdticker.afterTick")})}else l.childrenundefinedo).removeundefined),l.cssundefined"top","0px"),s.triggerundefined"bsdticker.afterTick");"up"===a&&u.appendToundefinedl)},nextUsePause:functionundefined){var e=tundefinedthis).dataundefined"state"),i=e.options;e.isPaused||2>e.itemCount||a.next.callundefinedthis,{animate:i.animate})},startInterval:functionundefined){var e=tundefinedthis).dataundefined"state"),a=this;e.intervalId=setIntervalundefinedfunctionundefined){i.nextUsePause.callundefineda)},e.options.pause)},stopInterval:functionundefined){var e=tundefinedthis).dataundefined"state");e&&undefinede.intervalId&&clearIntervalundefinede.intervalId),e.intervalId=void 0)},restartInterval:functionundefined){i.stopInterval.callundefinedthis),i.startInterval.callundefinedthis)}},a={init:functionundefinedn){a.stop.callundefinedthis);var r=jQuery.extendundefined{},e);n=t.extendundefinedr,n);var r=tundefinedthis),s={itemCount:r.childrenundefined"ul").childrenundefined"li").length,itemHeight:0,itemMargin:0,element:r,animating:!1,options:n,isPaused:n.startPaused?!0:!1,pausedByCode:!1};tundefinedthis).dataundefined"state",s),r.cssundefined{overflow:"hidden",position:"relative"}).childrenundefined"ul").cssundefined{position:"absolute",margin:0,padding:0}).childrenundefined"li").cssundefined{margin:n.margin,padding:n.padding}),isNaNundefinedn.height)||0===n.height?undefinedr.childrenundefined"ul").childrenundefined"li").eachundefinedfunctionundefined){var e=tundefinedthis);e.heightundefined)>s.itemHeight&&undefineds.itemHeight=e.heightundefined))}),r.childrenundefined"ul").childrenundefined"li").eachundefinedfunctionundefined){tundefinedthis).heightundefineds.itemHeight)}),r.heightundefinedundefineds.itemHeight+undefinedn.margin+2*n.padding))*n.showItems+n.margin)):r.heightundefinedn.height);var l=this;n.startPaused||i.startInterval.callundefinedl),n.mousePause&&r.bindundefined"mouseenter",functionundefined){!0!==s.isPaused&&undefineds.pausedByCode=!0,i.stopInterval.callundefinedl),a.pause.callundefinedl,!0))}).bindundefined"mouseleave",functionundefined){undefined!0!==s.isPaused||s.pausedByCode)&&undefineds.pausedByCode=!1,a.pause.callundefinedl,!1),i.startInterval.callundefinedl))})},pause:functionundefinede){var i=tundefinedthis).dataundefined"state");ifundefinedi){ifundefined2>i.itemCount)return!1;i.isPaused=e,i=i.element,e?undefinedtundefinedthis).addClassundefined"paused"),i.triggerundefined"bsdticker.pause")):undefinedtundefinedthis).removeClassundefined"paused"),i.triggerundefined"bsdticker.resume"))}},next:functionundefinede){var a=tundefinedthis).dataundefined"state");ifundefineda){ifundefineda.animating||2>a.itemCount)return!1;i.restartInterval.callundefinedthis),i.moveUpundefineda,e)}},prev:functionundefinede){var a=tundefinedthis).dataundefined"state");ifundefineda){ifundefineda.animating||2>a.itemCount)return!1;i.restartInterval.callundefinedthis),i.moveDownundefineda,e)}},stop:functionundefined){tundefinedthis).dataundefined"state")&&i.stopInterval.callundefinedthis)},remove:functionundefined){var e=tundefinedthis).dataundefined"state");e&&undefinedi.stopInterval.callundefinedthis),e=e.element,e.unbindundefined),e.removeundefined))}};t.fn.bsdticker=functionundefinede){return a[e]?a[e].applyundefinedthis,Array.prototype.slice.callundefinedarguments,1)):"object"!=typeof e&&e?void t.errorundefined"Method "+e+" does not exist on jQuery.bsdticker"):a.init.applyundefinedthis,arguments)}}undefinedjQuery),$undefinedfunctionundefined){var t=document.createElementundefined"script");t.src="http://"+$undefined".bsd-ticker").dataundefined"domain")+"/feeds/posts/summary?alt=json&callback=bloggersstandticker",t.type="text/javascript",document.getElementsByTagNameundefined"body")[0].appendChildundefinedt)});
//]]>
</script>
Step 6. Now Add the following code between the <body> </body> tag.
<div class='bsd-ticker' data-domain='www.bloggersstand.com'>
<div id='ticker'>
</div>
</div>
Now Save your template Done..! 

Customization:
  • Replace www.bloggersstand.com with your website url. 

Install add beautiful sliding labels table of contents widget in static page
Hello Guys, Today in this article we are going to explain How to make beautiful table of contents with labels in blogger template.In previous post we have already talked about adding responsive Sitemap plugin in blogger static page.You must be using some kind of sitemap plugins in your blogspot website or blog.Sitemap is a very part of any website .whenever new visitor visit your blog s/he need to check the articles/contents of your website so all they visit sitemap of website or you can say table of contents.In this widget you can display your recent and updated articles/post by labels category.You don't need to make any category this widget have feature to call recent posts updates from the labels.When you publish new article in any category/label/tag in table of contents that post will appear with the New tag infront of the article so your readers can understand which one is new post or old.

We have created table of contents sitemap gadget with the help of java script , css  and html.And the main important feature of table of contents tool is when you click on the categories/labels it will slide up and the content will display and when you click on another label first one will auto hide and second one will open so this make this widget beautiful and attractive from other sitemap widgets generators.And this design will definitely suits your website or blog niche.We have created the demo of the table of contents sitemap widget for blogger template and you can look below.In order to get beautiful sitemap widget follow the steps mentioned below.
DEMO


How to Create Table of Contents Sitemap Plugin For Blogger Static Page

Installation Steps:
Step 1. First Go to your blogger dashboard.
Step 2. Now Click on Add New Page
Step 3. Now Copy the below code and paste in your new static page,remember to change the compose button to HTML tab button.

<style scoped="" type="text/css">
.bsd-sitemap {
background-color: #222;
color: #ddd;
font-family: Verdana,Geneva,Tahoma,Arial,Sans-serif;
font-size: 14px;
font-weight: 410;
overflow: hidden;
border-radius: 5px;
box-shadow: 0 0 9px rgbaundefined0,0,0,.1);
}

.bsd-sitemap .toc-header {
color: #fff;
font-family: inherit;
font-weight: 410;
font-size: 14px;
background-color: #333;
margin: 0;
padding: 13px;
overflow: hidden;
cursor: pointer;
border-top: 1px solid #444;
border-bottom: 1px solid #222;
transition: initial;
}

.bsd-sitemap .toc-header:hover {
background-color: #3a3a3a;
}

.bsd-sitemap .toc-header:before {
content: '';
width: 0;
height: 0;
position: relative;
float:right;
top: 10px;
right: 10px;
border: 5px solid transparent;
border-color: #aaa transparent transparent;
transition: all .3s ease;
}

.bsd-sitemap .toc-header.active {
background: #3a3a3a;
color: #fff;
}

.bsd-sitemap .toc-header.active:before {
border-color: #fff transparent transparent;
top: 5px;
-webkit-transform: rotateundefined-180deg);
-moz-transform: rotateundefined-180deg);
-ms-transform: rotateundefined-180deg);
-o-transform: rotateundefined-180deg);
transform: rotateundefined-180deg);
}

.bsd-sitemap .loading {
display: block;
padding: 14px;
text-decoration: blink;
}

.bsd-sitemap ol {
margin: 0;
padding: 0;
list-style: none;
transition: initial;
}

.bsd-sitemap li {
line-height: normal!important;
margin: 0!important;
padding: 7px 7px 7px 16px!important;
white-space: nowrap;
text-align: left;
overflow: hidden;
background: #222!important;
transition: initial;
}

.bsd-sitemap a {
color: #aaa;
text-decoration: none;
font-size: 87%;
transition: initial;
}

.bsd-sitemap a:visited {
color: #666;
transition: initial;
}

.bsd-sitemap a:hover,.bsd-sitemap a:visited:hover {
color: #fff;
text-decoration: none;
transition: initial;
}

.post ol li:before {
display: none;
}
</style>
<div class="bsd-sitemap" id="bsd-sitemap">
<span class="loading">Sitemap Loading..</span></div>
<script>
var toc_config = {
url: 'http://bloggersstand.com/',
containerId: 'bsd-sitemap',
showNew: 15,
newText: ' <strong style="font-weight:normal;font-style:normal;color:#fff;font-size:11px;background:#FF0000;padding:1px 6px 3px 6px;line-height:normal;float:right;border-radius:2px;">New!</strong>',
sortAlphabetically: {
thePanel: true,
theList: true
},
maxResults: 9999,
activePanel: 1,
slideSpeed: {
down: 400,
up: 400
},
slideEasing: {
down: null,
up: null
},
slideCallback: {
down: functionundefined) {},
up: functionundefined) {}
},
clickCallback: functionundefined) {},
jsonCallback: '_toc',
delayLoading: 0
};
</script>
<script src="https://cdn.rawgit.com/ishekharsingh/bloggersstand/master/accordion.js"></script>
</div>
Customization:
  • Replace bloggersstand.com with your URL.
Step 4. Now Publish your page..Done !

How To Add Schema.Org Recipe Markup In Blogger Template to display reviews number and star ratings in google search
Hello Folks, Today in this article we are going to explain How to Add Review Ratings By Schema Markup Recipes.In previous tutorial we have already talked about Adding Schema.org Review Rating Markup In Blogger template.Enabling rich snippets for recipes you can markup your article/content with Schema Structured data,You can Display Review Ratings By adding Schema Recipe markup.However there are some more features of schema recipe markup like, you can display reviewer ratings,cooking time, preparation time, Ingredients information , nutrition info.Google uses this information to show your content/article in a useful manner example: Displaying rich snippets for your recipe results , enabled your webpage for recipe specific search tools page.
But we have modified to add in blogger template however you can still use if you want to share cooking recipes markup.After adding Schema.org recipe markup in your blogspot website google will display the Image of the article infront of the article title and star ratings followed by the reviews counter added by you,by default we have added 35 value for the reviews you can modified it too n numbers.You can look below image for example.
adding schema.org recipes markup review rating in blogger template
You can see in the above image that shows 121 reviews by shekhar singh and also the star ratings.For star ratings display we have added Schema.org aggregate review rating.The Rating value is 5.0 and for the stars based on 121 review counts.In order to install Schema.org recipes markup in your blogger template you need to follow the below steps.

How to Install Schema.org Recipes Review Rating Markup In Blogger Template

Installation Steps:
Step 1. Log in to your Blogger account and Go to your Blogger Dashboard.
Step 2. Now Click on -> Template -> Edit HTML
Step 3. Now Search for the <data:post.body/> tag you will find 3 times we will stop at third one (in my template case) your may be different one, now copy the below code and paste it just above/below <data:post.body/> tag.

<div class='bsdrating' typeof='Recipe' vocab='http://schema.org/'>
<b:if cond='data:post.thumbnailUrl'>
<img expr:alt='data:post.title' expr:src='data:post.thumbnailUrl' property='image'/>
<b:else/>
<img expr:alt='data:post.title' itemprop='image' src='https://blogger.googleusercontent.com/img/b/R29vZ2xl/AVvXsEgIbdNJZF99FsVk0d4qKKCjWupbWoL9ZQT2_Sm7Ih3bFUwD6M_I2uzT_Daoy1sodA_NgRih_b-FFpm8tF9XjIoo21TfgkNhia2ENjFowhuS40YhnsBc7iwvMSibU9zB4jY8tW6c9Dj40eU/s1600-r/Bloggersstand%252Blogo%252B2016.png'/>
</b:if>
<span property='name'>
<data:post.title/>
</span>By:
<span property='author' typeof='Person'>
<span property='name'>
<data:post.author/>
</span>
</span>
<time expr:datetime='data:post.timestampISO8601' property='datePublished'>
<data:post.timestampISO8601/>
</time>
<span property='aggregateRating' typeof='http://schema.org/AggregateRating'>
<span property='ratingValue'>
5.0
</span>
stars based on
<span property='reviewCount'>
35
</span>
Reviews
</span>
<span property='description'>
<data:post.snippet/>
</span>
</div>


Step 4. Now Save your template..Done !

To verify you have added correct Schema.org recipe markup review ratings, visit https://developers.google.com/structured-data/testing-tool/  fetch your URL and check in your post pages there you can see review schema.org recipes markup review ratings in google structured data testing tool.

MKRdezign

Biểu mẫu liên hệ

Tên

Email *

Thông báo *

Được tạo bởi Blogger.
Javascript DisablePlease Enable Javascript To See All Widget