Demo Các hướng dẫn thủ thuât trên Blogsopt

tháng 3 2016
Add-on Wordpress Plugin Adsense Backlinks Best Blogger Template Blog And Magazine Wordpress Themes Blogger Gadgets Blogger Plugins Blogger SEO Blogger SEO Tips Blogger Templates Blogger Tricks Blogger Tutorials Blogger Widgets Blogging Blogspot Series BlueHost Business City CodeCanyon Computer Corporate Wordpress Theme Creative Creative Market Creative Wordpress Theme CSS Cuisines Destination Directory & Listings Domain eCommerce WordPress Plugin eCommerce Wordpress Theme Extensions Pack Facebook Fashion FontAwesome Foods Gallery Google Google AdSense Google Webmaster Tools Hack Host Hosting HTML Hướng dẫn JavaScript Magazine Blogger Template Make Money Online Marketing Material Design Membership Miscellaneous MultiMedia Blogger Templates Multipurpose Blogger Template Music MySQL News News Blogger Template People Phần mềm Phones Photography PHP Portfolio Premium Blogger Templates Productivity Responsive Blogger Template Rss Subscribe Widget SEO SEO Optimized Blogspot Templates SEO Tips SEO Wordpress SEO Wordpress Tips Server Social Media Share Button Social Subscription Widget Software Soliloquywp Speaker Tablets Tài liệu Tech Technology Template Blogspot TheEventsCalendar Thủ Thuật Thủ Thuật Blogger Thủ Thuật Máy Tính Tin tức Tool Travel Trends Utilities WordPress Plugin Video Wedding Widgets WooCommerce Wordpress Plugin Wordpress Seo Wordpress ThemeForest Themes Wordpress Themes Wordpress Tricks Wordpress Tutorials World News WP Plugins WP Sliders Yahoo Youtube

Full documentation of the sevida v2.4.2 responsive blogger template

Sevida is the premium responsive blog and magazine template for Blogger fans. This template shows you how cool and flexible Blogspot. Bloggersstand brings the full documentation of the sevida v2.4.2 for our precious readers,Now you can easily edit the sevida v2.4.2 lot's of visitors asking everyday for the settings and customizing the template,so finally we thought to release the full tutorial + documentation of sevida V2.4.2.After this tutorial you still face any problem you can ask us anytime.Enjoy the release of the documentation.

How To Install + Edit + Customize Sevida V2.4.2 Responsive Blogger Template

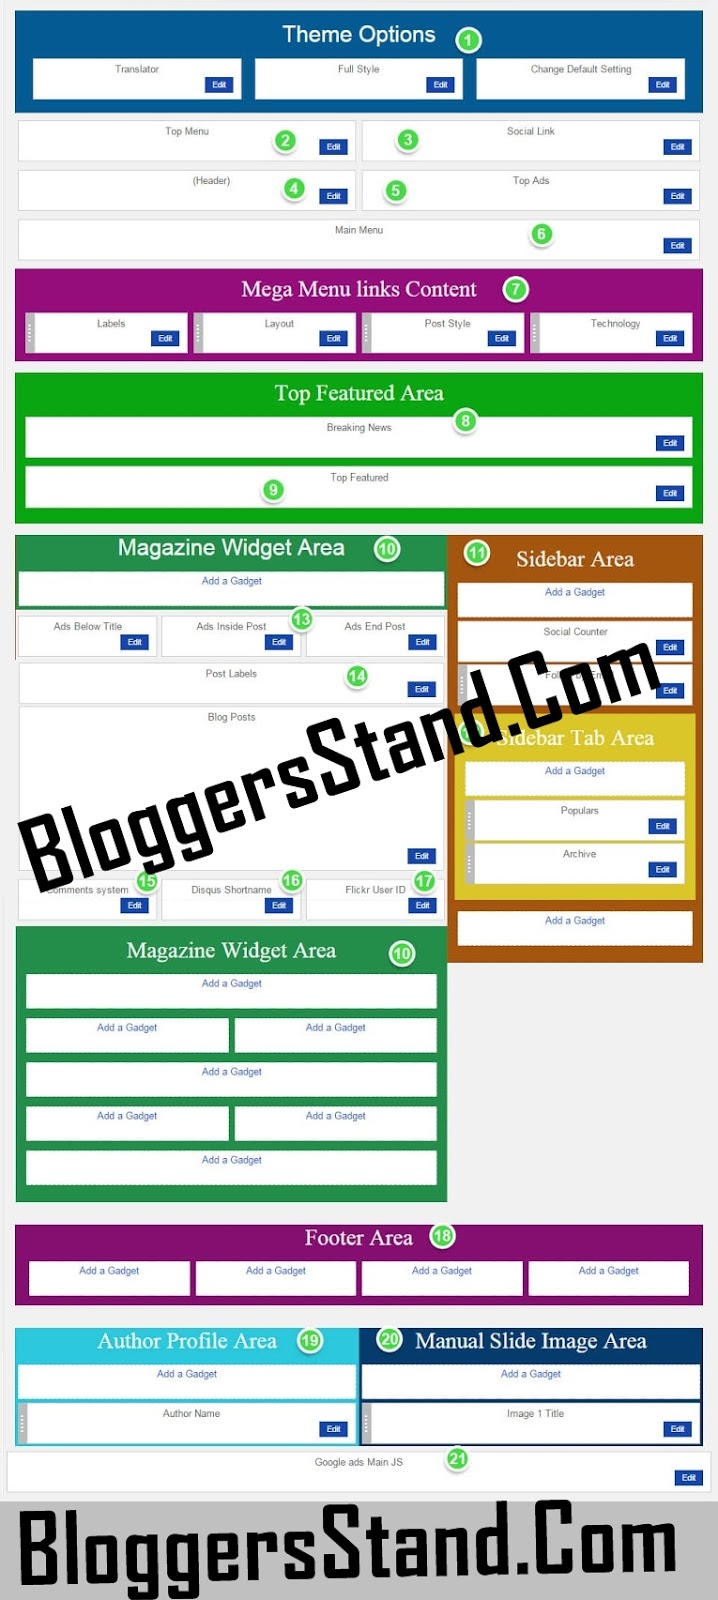
  • Theme Options Area (this area to change default option)
  • Top Menu Area
  • Top Social Link area
  • Header Area
  • Top Ads Area (Recommended 720 x 90)
  • Main Menu Area
  • Mega Menu Links Content area (this widget will show if you add -links to main menu)
  • News Ticker Area
  • Top Featured Post Area
  • Magazine Widget Area (this just show on Homepage and section for Recent post by Label widget)
  • Right Sidebar Area
  • Sidebar Tab Widget Area
  • Place to add ads. Code from Ads Inside Post widget will show if you are add [ads-post] in your article
  • Post Label area (this label will show on Latest Post title)
  • This to control your blog comment system ([blogger][facebook][disqus])
  • Put yours disqus shortname here if you want to add disqus comments
  • Yours flickr ID here if you want to add flickr badge
  • Footer Area
  • Author Profile Area
  • Manual Image Area (all Image widget from this area will show if you add manualslide in yours HTML widget)
  • This will enable google adsense Javascript, Just "y" to enable it and "n" to disable

Theme Options:


    1. Translator Widget: 
    On "New Site Name" fild1 field add the default language
    And on "New Site URL" fild2 field add your language.
    /*------ English To Arabic ------*/
    fild1 : Popular Posts
    fild2 : المقالات الشائعة
    /*------ English To French ------*/
    fild1 : Popular Posts
    fild2 : Articles populaires
    /*------ English To Allemand ------*/
    fild1 : Popular Posts
    fild2 : Beliebte Beiträge

    /*------ English To Espagnol ------*/
    fild1 : Popular Posts
    fild2 : Puestos Popular
    2. Default is Boxed Style. If you want to change it to Full Width style just add this "y" and if you to make if Boxed Style again just change it to "n"

    3. This to change other Default Setting in this theme sumlength,fixMenu recentpost, recentcomment, related, featuredpost, random and etc.
    On "New Site Name" field Property. ex: recentpost
    And on "New Site URL" field max number. ex: 6
    PropertyDescriptionDefault
    sumlength this to change max summary length on Main Recent Post 200
    fixMenu if you want to enable or disable fixmenu effect on main menu. Support value "y" or "n" y
    monthName If you want to change month name on post Jan,Feb,Mar ,Apr,May,Jun, Jul,Aug,Sep, Oct,Nov,Dec
    FullmonthName if you want to change month name on date and time (Top Menu) January,February, March,April,May,June,July, August,September,October, November,December
    stickyMenu if you want do enable or disable sticky Sidebar. Support value "y" or "n" y
    sliderspeed if you want to change slider speed. (in milisecond) 5000
    navipostpage if you want to change Page Navigation number 20
    rcadminBlog hide Admin Comment on recentcomment. Support value "y" or "n" n
    shideauthor to show or hide author name on Widget by Labels. Support value "y" or "n" n
    hideLatest this to hide Main Latest Post in home n
    cseID If you want to add Google Custom Search Engine (Google CSE) effect to top menu search. Just add yours Google CSE code like this: 013487895970210376374:11mzjaatn8s
    hideEmo this to show or hide Emoticon Effect in Blogger comment and Recent comment widget. Support value "y" or "n" n
    homelist this to change Main Latest Post style to List style. Support value "y" or "n" n
    disabletime this to disable date and time on Top menu. Support value "y" or "n" n
    homePageNavi this to change Main Latest Post Ajax Load More to Page Navigation.Support value "y" or "n" n
    fbappsid this to change Facebook Apps ID 487910834570906
    fblang this to change Facebook Language en_US
    dajaxPageNavi this to disable ajax effect on Page Navigation. Support value "y" or "n" n
    srctext this to change text inside the Menu Search box Type and hit enter to search...
    ntext this to change "Next" text in blog post Navigation Next
    ptext this to change "Previous" text in blog post Navigation Previous
    mtext this to change "More" text More
    lmtext this to change "Load More Post" text View More About
    reltext this to change "Related Post" text in Related Post Widget Related Post
    rectext this to change "Recent Post" text in Related Post Widget Recent Post
    tweettext If you want to change text "Tweet" text in Social buttonTweet
    liketext If you want to change text "Like" text in Social button Like
    sharetext If you want to change text "Share" text in Social buttonShare
    readmoretext this to change "Read more »" text Read more »
    twitterauthor If you want to change twitter author when click Tweet buttonsatankMKR
    relstyle If you want to Related Post style. Support value: "carousel", "simple" and "fbig" Carousel
    hreview If you want to hide review value in Recent Post and Recent Post widget by Label. Support value: "n" and "y" n
    jsonload If you want to change JSON feed load from widget by Label. Support value: "default" and "summary" default
    hexcerpt If you want to hide excerpt text below the title. Support value: "n" and "y" n
    firstthumb this to change First thumbnail Size on fbig, column2 widget s450
    thumb this to change thumbnail size w90-h65-c
    sliderthumb this to change slider thumbnail size s800
    dajaxsrc this to disable ajax search effect. Support value "y" or "n" n
    featpost if you want to make first image in blog post become Featured Image. Support value y or n n
    topbreakline If you to show breakline below post title. Support value y or n n
    bottombreakline If you to show breakline in end post. Support value y or n n
    autoplay If you want to make Related Post (carousel style autoplay). Support value y or n n
    topbreaklineload This to change top breakline load data. Support value "related", "recent" and "random" Recent
    bottombreaklineload This to change bottom breakline load data. Support value "related", "recent" and "random" Recent
    recentpost this to change max item show in recentpost widget n
    randompost this to change max item show in randompost widget. 4
    featuredpost this to change max item show in featuredpost widget. 4
    recentcomment this to change max item show in recentcomment widget. 5
    fbig1 this to change max item show in fbig1 widget. 5
    fbig2 this to change max item show in fbig2 widget. 5
    gallery1 this to change max item show in gallery1 widget. 10
    gallery2 this to change max item show in gallery2 widget. 5
    gallery3 this to change max item show in gallery3 widget. 6
    column1 this to change max item show in column1 widget. 5
    column2 this to change max item show in column2 widget. 5
    newsticker this to change max item show in newsticker widget. 9
    slider this to change max item show in slider widget. this for all slider. (slider1 and slider2) 5
    carousel1 this to change max item show in carousel1 widget 9
    carousel2 this to change max item show in carousel2 widget. 9
    related this to change max item show in related widget. 9
    video this to change max item show in video widget. 6
    featured1 this to change max item show in featured1 widget. 8
    featured2 this to change max item show in featured2 widget. 10
    featured3 this to change max item show in featured3 widget. 10
    featured4 this to change max item show in featured4 widget. 5
    featured5 this to change max item show in featured5 widget. 7
    animatedpost this to change max item load if widget have animated effect. 9
    list this to change max item show in list widget. 6
    hot this to change max item show in hot widget. 3
    timeline this to change max item show in timeline widget. 5
    blogpost this to change max item show in blogpost widget. 4
    halfpost this to change max item show in halfpost widget. 4
    bigpost this to change max item show in bigpost widget. 4
    simplepost this to change max item show in simplepost widget. 4
    disquscomment this to change max item show in disquscomment widget. 4
    flickrbadge this to change max item show in flickrbadge widget. 8

    Default Setting

    After installing the theme, this it the minimum setting to make all widget works fine in this themes.

    Embedded Comment
    This to make comment area like the Demo and make Emoticon show

    • On Blogger Dashboard Click Setting.
    • Click Posts and Comments
    • in Comment Location Choose Embedded
    • Then Click Save settings.

    Blog Feed
    This to make recent comment, Search Result, Featured Post, and Post by Label work fine

    • On Blogger Dashboard Click Setting.
    • Click Other
    • in Site Feed Allow Blog Feed Choose Full Or Short
    • Then Click Save settings.

    Points To Remember:
    • If yours post have image uploaded on blogspot you can choose SHORT. but if yours post just have image from third party image hosting you must choose Full
    • Blogger feed must be not redirect to other feed site like Feedburner
    • Your's blog or website not Private.

    Configuration Blog Posts
    This default setting to make yours website like the demo 
    • On Blogger Dashboard Click Layout.
    • On Blog Posts Widget Click Edit
    • Configure like image below
    • Then Click Save.


    Setting the Menu:

    Top Menu:
    To Edit Top Menu in this theme you can follow this step:
    1.First Go to Dashboard > Layout > Edit Top Menu > Configure Link List

    2.On "New Site Name" field add your menu title like as this :
    Menu Title

    3.And on "New Site URL" field add your url address.


    4.To add Sub Menu just add _ before yours Menu Title
    _Sub Menu

    5.To add Sub Menu just add __ before yours Menu Title
    __Sub Sub Menu

    6.To add icon in top menu you can add code like this: <i class="fa fa-ICON_NAME"></i> before or after menu name eg:
    <i class="fa fa-facebook"></i>Menu Title

    _<i class="fa fa-twitter"></i>Sub Menu

    __<i class="fa fa-pinterest"></i>Sub Sub Menu

    Note: You can get Fontawesome icons by visiting : http://fontawesome.io/icons

    Setting the Main Menu


    To Edit Top Menu in this theme you can follow this step:
    1.First Go to Dashboard > Layout > Edit Main Menu > Configure Link List
    2.On "New Site Name" field add your menu title and Sub title like as this :
    Menu Title [Sub Title]

    3.And on "New Site URL" field add your url address.

    4.To add Sub Menu just add _ before yours Menu Title
    _Sub Menu

    5.To add Sub Sub Menu just add __ before yours Menu Title.
    __Sub Sub Menu

    6.To add icon in top menu you can add code like this: <i class="fa fa-ICON_NAME"></i> before or after menu name.
    <i class="fa fa-facebook"></i>Menu Title

    _<i class="fa fa-twitter"></i>Sub Menu

    __<i class="fa fa-pinterest"></i>Sub Sub Menu

    Note: You can get Fontawesome icons by visiting : http://fontawesome.io/icons

    Add Mega Menu

    a.) Mega Menu (block style "-links")

    To add a block style "-links" simply on "New Site Name" field add this
    -links

    Note This will load content from "Mega Menu Links Contents"

    b.) Mega Menu (Tabs style)
    To add a Mega Menu tabs style simply on "New Site Name" field add this.
    -mtab/Label_1,Label_2,Label_3,Label_4

    c.) Mega Menu (Grip style)
    To add a Mega Menu grip style simply on "New Site Name" field add this.
    -grip/LabelName or recent or random

    d.) Mega Menu (First Big Style)

    To add a Mega Menu First Big Style simply on "New Site Name" field add this

    -mbig/LabelName or recent or random

    Complete Menu will look like this:

    Note: Subtitle just work in Main Menu Widget.


    Setting the Social Icons:

    To Edit Social Icon in this theme you can follow this step:

    • First Go to Dashboard > Layout > Edit Social Link > Configure Link List
    • On "New Site Name" field add your social name : facebook, twitter, rss, dribbble, google, pinterest, linkedin, youtube, vimeo, skype, deviantart, flickr, stumbleupon, tumblr, delicious, digg, lastfm, wordpress, instagram, apple, dropbox, behance, reddit.
    • And on "New Site URL" field add your social url adress.
    • Then click Save.

    Setting Meta Tag (Facebook,Twitter,Google+)


    1.On Blogger Dashbord Click Template
    2.Click Edit HTML

    3.Scroll down and Find this Code :
    <meta content='YOUR KEYWORDS HERE' name='keywords'/>
    <!-- Metadata Facebook -->
    <meta expr:content='data:blog.title' property='og:site_name'/>
    <meta expr:content='data:blog.pageTitle' property='og:title'/>
    <meta content='article' property='og:type'/>
    <meta expr:content='data:blog.url' property='og:url'/>
    <meta content='100002549773049' property='fb:admins'/>
    <!-- Metadata Twitter -->
    <meta name='twitter:card' value='summary'/>
    <meta expr:content='data:blog.pageTitle' name='twitter:title'/>
    <meta content='@publisher_handle' name='twitter:site'/>
    <meta content='@author_handle' name='twitter:creator'/>
    4.Change YOUR KEYWORDS HERE with yours website keywords.

    Note: meta tag keywords no more use to improve the SEO. because now meta tag keywords just support for bing search engine.

    5.Change 100002549773049 with yours Facebook Admin ID
    6.Change @publisher_handle with yours twitter ID/Website twitter ID and change @author_handle with yours twitter ID too.

    Note: Before your cards show on Twitter, you must first have your domain approved. Fortunately, it's a super-easy process. After you implement your cards, simply enter your sample URL into the validation tool. After checking your markup, select the "Submit for Approval" button. Visit : https://dev.twitter.com/docs/cards/validation/validator for testing and approval.

    Settings Summary Length,Comments,Author Profile and etc:

    Summary Length
    • On Blogger Dashbord Click Layout
    • on Theme Option Area click Edit on Change Default Setting
    • In New Site Name sumlength and New Site URL add yours number value. Ex: if you want to make 200 length just add that.
    • Then Click Add Link then Click Save.

    Page Navigation Number:
    • On Blogger Dashbord Click Layout
    • on Theme Option Area click Edit on Change Default Setting
    • In New Site Name navipostpage and New Site URL add yours number value. Ex: if you want to make 10 post show. Just add it
    • Then Click Add Link then Click Save.

    Main Latest List Style
    • On Blogger Dashbord Click Layout
    • on Theme Option Area click Edit on Change Default Setting
    • In New Site Name homelist and New Site URL add y.
    • Then Click Add Link then Click Save.

    Main Latest Page Navigation
    • On Blogger Dashbord Click Layout
    • on Theme Option Area click Edit on Change Default Setting
    • In New Site Name homePageNavi and New Site URL add y.
    • Then Click Add Link then Click Save.
    Recent Comments (Hide Admin )
    • On Blogger Dashbord Click Layout
    • on Theme Option Area click Edit on Change Default Setting
    • In New Site Name rcadminBlog and New Site URL add y.
    • Then Click Add Link then Click Save.
    JSON Search result
    • On Blogger Dashbord Click Layout
    • on Theme Option Area click Edit on Change Default Setting
    • In New Site Name dajaxsrc and New Site URL add y.
    • Then Click Add Link then Click Save.
    Google CSE
    • On Blogger Dashbord Click Layout
    • on Theme Option Area click Edit on Change Default Setting
    • In New Site Name cseID and New Site URL add yours google CSE ID code.
    • Then Click Add Link then Click Save.

    Emoticon
    • On Blogger Dashbord Click Layout
    • on Theme Option Area click Edit on Change Default Setting
    • In New Site Name hideEmo and New Site URL add y.
    • Then Click Add Link then Click Save.

    Comment Setting
    1.On Blogger Dashbord Click Layout
    2.Click Edit on Comments system widget and inside it add your comments systems you need in this way

    [blogger] for blogger comments

    [facebook] for facebook comments

    [disqus] for disqus comments

    you can add one system, two or three as you like and with arrangement you need for example

    [facebook]

    [facebook][blogger]

    [blogger][facebook]

    [disqus][facebook][blogger]

    3.Then Click Save.

    Setting to make Disqus Comment
    • On Blogger Dashbord Click Layout
    • Click Edit on Disqus Shortname widget and inside it add your disqus Shortname
    • Then Click Save

    Get Disqus Shortname
    • Access your Disqus Admin and choose Settings
    • Then scroll down to Site Identify, you will see your username (shortname).

    Author Profile
    1.On Blogger Dashbord Click Layout
    2.Click Edit on Author Profile Area and inside it add code like this:
    {picture#YOUR_PROFILE_PICTURE_URL}
    YOUR_PROFILE_DESCRIPTION
    {facebook#YOUR_SOCIAL_PROFILE_URL}
    {twitter#YOUR_SOCIAL_PROFILE_URL}
    {google#YOUR_SOCIAL_PROFILE_URL}
    {pinterest#YOUR_SOCIAL_PROFILE_URL}
    {youtube#YOUR_SOCIAL_PROFILE_URL}
    {instagram#YOUR_SOCIAL_PROFILE_URL}
    3.Then Click Save
    4.If you have want add more Author Profile Just add New HTML widget on Author Profile Area and fill like above.

    Flickr ID

    • On Blogger Dashbord Click Layout
    • Click Edit on Flickr User ID widget and inside it add your flickr ID
    • Then Click Save

    Widgets Top Featured, Slider, Column, Social Counter and etc.


    News Ticker
    1.On Blogger Dashbord Click Layout
    2.Click Edit on Breaking News widget and inside it add code like this:
    [recent][newsticker]

    if you want newsticker load random. code like this.
    [random][newsticker]

    if you want newsticker load from specific Label/Category. Ex. Load from Technology code like this.
    [Technology][newsticker]

    Top Featured Post
    1.On Blogger Dashbord Click Layout
    2.Click Edit on Top Featured widget and inside it add code like this:
    Available Featured Type : featured1, featured2, featured3, featured4, featured5
    Add code like this:
    [Your_Labels_Here][featured1]

    Example (Show Featured Post from Multiple Labels "Music,Technology,Fashion,Trends")
    [Music,Technology,Fashion,Trends][featured1]

    Example (Show Featured Post from Recent Post) 
    [recent][featured2]

    Example (Show Featured Post from Random Post) 
    [random][featured2]

    Note: Maximun Labels Support for Multiple Labels is 4
    Note: Random and Multiple Labels need more time to load

    3.Then Click Save.

    Social Counter

    1.On Blogger Dashbord Click Layout then click Edit in Social Counter Widget
    2.On "New Site Name" fild1 field add Social Name (Social Counter)
    3.And on "New Site URL" fild2 field add your Social Url.
    Example : Note Only this Socials Supported !
    facebook [1.1k]
    twitter [2k]
    google [250]
    rss [590]
    youtube [3.5k]
    dribbble [8.2m]
    instagram [732]
    pinterest [210]
    linkedin [2.56k]
    vimeo [300]
    skype [568]
    deviantart [6.4k]
    flickr [900]
    stumbleupon [561]
    tumblr [5.4m]
    delicious [86]
    digg [789]
    lastfm [652]
    wordpress [1.5k]
    apple [60]
    dropbox [980]
    behance [366]
    reddit [10]
    4. Then Click Save.

    Widget by Labels

    First Big 1

    1.On Blogger Dashbord Click Layout
    2.Click Add a Gadget on Magazine Widget Area
    3.Choose HTML/Javascript
    4.Copy this Code:
    [Yours_Label_Name][fbig1]

    ex: load from Music label.
    [Music][fbig1]


    Note: "Yours_Label_Name" is yours Labels you want to load.

    Note: you can change "Yours_Label_Name" with "recent" if you want load latest post or "random" if you want load Random post.

    If you want load from other Blog. code look like this:
    [Yours_Label_Name][fbig1][Other_URL]

    Ex: Load Tecnology from otherblog.com
    [Tecnology][fbig1][http://otherblog.com]

    if you want change Widget title color. code like this
    [Yours_Label_Name][fbig1][Hexcolorcode]

    ex: width this color: #8ED557 
    [Yours_Label_Name][fbig1][#8ED557]

    if you want add Animated Effect. Code like this:
    [Yours_Label_Name][fbig1 animated]

    5. Then Click Save.

    First Big 2

    1.On Blogger Dashbord Click Layout
    2.Click Add a Gadget on Magazine Widget Area
    3.Choose HTML/Javascript
    4.Copy this Code:
    [Yours_Label_Name][fbig2]

    ex: load from Music label.
    [Music][fbig2]

    Note: "Yours_Label_Name" is yours Labels you want to load.
    Note: you can change "Yours_Label_Name" with "recent" if you want load latest post or "random" if you want load Random post. 

    If you want load from other Blog. code look like this:
    [Yours_Label_Name][fbig2][Other_URL]

    Ex: Load Tecnology from otherblog.com
    [Tecnology][fbig2][http://otherblog.com]

    if you want change Widget title color. code like this
    [Yours_Label_Name][fbig2][Hexcolorcode]

    ex: width this color: #8ED557 
    [Yours_Label_Name][fbig2][#8ED557]

    5. Then Click Save.

    Column 1

    1.On Blogger Dashbord Click Layout
    2.Click Add a Gadget on Magazine Widget Area
    3.Choose HTML/Javascript
    4.Copy this Code:
    [Yours_Label_Name][column1]

    ex: load from Music label.
    [Music][column1]

    Note: "Yours_Label_Name" is yours Labels you want to load.
    Note: you can change "Yours_Label_Name" with "recent" if you want load latest post or "random" if you want load Random post 

    If you want load from other Blog. code look like this:
    [Yours_Label_Name][column1][Other_URL]

    Ex: Load Tecnology from otherblog.com
    [Tecnology][column1][http://otherblog.com]

    if you want change Widget title color. code like this
    [Yours_Label_Name][column1][Hexcolorcode]

    ex: width this color: #8ED557
    [Yours_Label_Name][column1][#8ED557]

    if you want add Animated Effect. Code like this:
    [Yours_Label_Name][column1 animated]

    5. Then Click Save.

    Column 2

    1.On Blogger Dashbord Click Layout
    2.Click Add a Gadget on Magazine Widget Area
    3.Choose HTML/Javascript
    4.Copy this Code:
    [Yours_Label_Name][column2]

    ex: load from Music label.
    [Music][column2]

    Note: "Yours_Label_Name" is yours Labels you want to load.
    Note: you can change "Yours_Label_Name" with "recent" if you want load latest post or "random" if you want load Random post 

    If you want load from other Blog. code look like this:
    [Yours_Label_Name][column2][Other_URL]

    Ex: Load Tecnology from otherblog.com
    [Tecnology][column2][http://otherblog.com]

    if you want change Widget title color. code like this
    [Yours_Label_Name][column2][Hexcolorcode]

    ex: width this color: #8ED557
    [Yours_Label_Name][column2][#8ED557]

    if you want add Animated Effect. Code like this:
    [Yours_Label_Name][column2 animated]

    5.Then Click Save.

    Hot Post

    1.On Blogger Dashbord Click Layout
    2.Click Add a Gadget on Magazine Widget Area
    3.Choose HTML/Javascript
    4.Copy this Code:
    [Yours_Label_Name][hot]

    ex: load from Music label.
    [Music][hot]

    Note: "Yours_Label_Name" is yours Labels you want to load.
    Note: you can change "Yours_Label_Name" with "recent" if you want load latest post or "random" if you want load Random post 

    If you want load from other Blog. code look like this:
    [Yours_Label_Name][hot][Other_URL]

    Ex: Load Tecnology from otherblog.com
    [Tecnology][hot][http://otherblog.com]

    if you want change Widget title color. code like this
    [Yours_Label_Name][hot][Hexcolorcode]

    ex: width this color: #8ED557 
    [Yours_Label_Name][hot][#8ED557]

    5.Then Click Save.

    That's it Folks !!

    How To install make Google URL Shortner for articles  In Blogger Template
    Hello Folks, Today in this article we are going to explain How to add Google Url Shortner Api in blogger template.You might have noticed on social media sites or also in so many websites they are providing short urls instead of original url.There is no harm in sharing your articles/content with the google short url.And it's provided by google so you can trust blindly on the plugin.After installing you can share your urls from your blogspot website or blog instead of leaving and going to google shortner service which is officially provided by google. You can search on google url shortner  and you can see google is providing shortner api for urls.When you share your urls with google url shortner tool from your website your url will start with goo.gl.you can share url on facebook , twitter, google plus etc.Google Shortner is very old service so there is no damage will be happen with urls.And this trick is totally defer/async so it will not effect your webpage loading speed.In order to get google url shortner for your contents/article follow the steps mentioned below.

    How to Install Google URL shortner API plugin in blogger template

    Installation Steps:
    Step 1. Log in to your Blogger account and Go to your Blogger Dashboard.
    Step 2. Now Click on -> Template -> Edit HTML.
    Step 3. Now Search for ]]></b:skin> or </style> by Pressing Ctrl+F keys or CMD+F.
    Step 4. Now Copy the below CSS code and paste it just above/before </style> or ]]></b:skin>.
    <b:if cond='data:blog.pageType == &quot;item&quot;'>
    <style type='text/css'>
    .bsdshorturl{font-size:100%;font-weight:bold;color:#666!important}
    .bsdshorturl a.url{text-decoration:none!important;color:#666!important;display:inline-block;margin:0 0 0 5px;border-radius:3px;background:#fefefe;border:1px solid #666;box-shadow:0 1px 0 rgba(0,0,0,.08);text-shadow:none;line-height:23px;padding:1px 8px 0 5px;transition:all 400ms ease-in-out}
    .loadingbsd-shorturl{display:none}
    .bsdshorturl a.url:hover{color:#555;background:#fefefe;border:1px solid #999}
    .bsdshorturl a.url:active{box-shadow:inset 0 1px 0 rgba(0,0,0,.16)}
    .clear{clear:both}
    </style>
    </b:if>
    Step 5. Now search for <data:post.body/> and copy the below HTML code and paste it just after/below <data:post.body/> tag. [points to remember you will find <data:post.body/> 3 times but you need to stop at second one if not work then go for third one.]
    <b:if cond='data:blog.pageType == &quot;item&quot;'>
    <span class='bsdshorturl'>
    Share with short Link: <a class='url' expr:onclick='&quot;shortenUrl(this, &amp;#39;&quot; + data:post.url + &quot;&amp;#39;, &amp;#39;googl&amp;#39;);return false;&quot;' href='javascript:void(0)' title='Get short URL'>Get Short URL</a></span><span class='loadingbsd-shorturl'><img alt='loading short url' src='data:image/gif;base64,R0lGODlhEAALAPQAAP///wAAANra2tDQ0Orq6gYGBgAAAC4uLoKCgmBgYLq6uiIiIkpKSoqKimRkZL6+viYmJgQEBE5OTubm5tjY2PT09Dg4ONzc3PLy8ra2tqCgoMrKyu7u7gAAAAAAAAAAACH/C05FVFNDQVBFMi4wAwEAAAAh/hpDcmVhdGVkIHdpdGggYWpheGxvYWQuaW5mbwAh+QQJCwAAACwAAAAAEAALAAAFLSAgjmRpnqSgCuLKAq5AEIM4zDVw03ve27ifDgfkEYe04kDIDC5zrtYKRa2WQgAh+QQJCwAAACwAAAAAEAALAAAFJGBhGAVgnqhpHIeRvsDawqns0qeN5+y967tYLyicBYE7EYkYAgAh+QQJCwAAACwAAAAAEAALAAAFNiAgjothLOOIJAkiGgxjpGKiKMkbz7SN6zIawJcDwIK9W/HISxGBzdHTuBNOmcJVCyoUlk7CEAAh+QQJCwAAACwAAAAAEAALAAAFNSAgjqQIRRFUAo3jNGIkSdHqPI8Tz3V55zuaDacDyIQ+YrBH+hWPzJFzOQQaeavWi7oqnVIhACH5BAkLAAAALAAAAAAQAAsAAAUyICCOZGme1rJY5kRRk7hI0mJSVUXJtF3iOl7tltsBZsNfUegjAY3I5sgFY55KqdX1GgIAIfkECQsAAAAsAAAAABAACwAABTcgII5kaZ4kcV2EqLJipmnZhWGXaOOitm2aXQ4g7P2Ct2ER4AMul00kj5g0Al8tADY2y6C+4FIIACH5BAkLAAAALAAAAAAQAAsAAAUvICCOZGme5ERRk6iy7qpyHCVStA3gNa/7txxwlwv2isSacYUc+l4tADQGQ1mvpBAAIfkECQsAAAAsAAAAABAACwAABS8gII5kaZ7kRFGTqLLuqnIcJVK0DeA1r/u3HHCXC/aKxJpxhRz6Xi0ANAZDWa+kEAA7AAAAAAAAAAAA'/></span>
    <div class='clear'/>
    </b:if>
    Step 6 . Now Search for closing </body> tag and copy the below java script and paste it just above/before </body> tag.
    <b:if cond='data:blog.pageType == &quot;item&quot;'>
    <script type='text/javascript'>
    //<![CDATA[
    // Shortner url by www.bloggersstand.com
    function downloadJSAtOnload(){var e=document.createElement("script");e.src="https://cdn.rawgit.com/ishekharsingh/bloggersstand/master/shorturl.js",document.body.appendChild(e)}window.addEventListener?window.addEventListener("load",downloadJSAtOnload,!1):window.attachEvent?window.attachEvent("onload",downloadJSAtOnload):window.onload=downloadJSAtOnload;
    //]]>
    </script>
    </b:if>
    Step 7. Now Save your Template.Done !

    Hosting your javascript and css file for blogger on github
    Are you Facing problem in hosting JavaScript or CSS for your blogger website? Today in this article we are going to explain How to Host Free JavaScript and CSS For blogger on Github.

    What is Github?

    Github is started in  2008 and in 2009 github becomes the most popular open source project hosting website. Github is the Online web based Git Repository hosting site for projects, Software and development of any kind projects. Github provide Free hosting service and Commerical packages open source projects.Also includes source-code browser, in-line editing, wikis, and ticketing. Free for public open-source code.

    How To Upload JavaScript and CSS on Git Repository For Free

    Installation Steps:
    Step 1. First visit the https://github.com
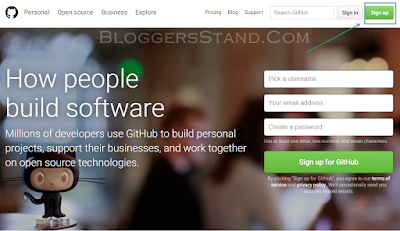
    Step 2.  Now Click On Sign Up Button.
    sign up on git hub
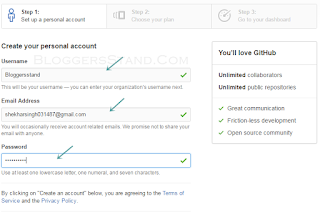
    Step 3. Now Create Your Username , Add email Address and password for creating account on Github.
    enter your username , email address and password for creating account
    Step 4. Now Go to your email and activate the Github Account.
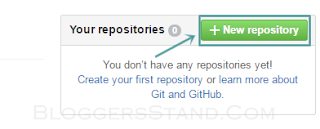
    Step 5. Now We will Create new repository [or you can say new folder].
    create new repository in github
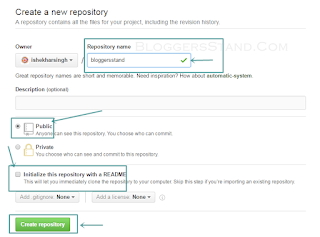
    Step 5. Now After clicking on New Repository , enter your website or blog name or any name your want to give for your project.
    how to create new repository for hosting projects in github
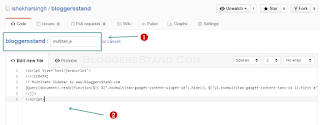
    Step 6. Now Create your javascript or CSS file name and Paste the Code snippet in the box.
    add javascript , css or project in github
    Step 7 . Now Hit the Commit new file button just below the Code box.
    commit new file in github
    Step 8. Now you need the file link.For that just go to your repository and click right mouse button and copy link address.
    right click on repository to get url
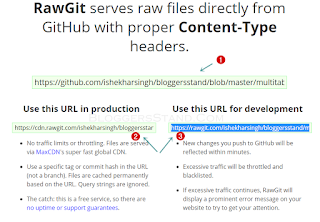
    Step 9. After copying the url you need to open https://rawgit.com and just paste the url in the box 1 and after that you need to copy the production url for your website becuase in the production url there is no limit of traffic and files are servedfast global CDN and 2nd url for development you can use development Url for  hosting your own website or blog Files on github.If you are sharing Code snippets with the readers you must use production url.
    copy the url form rawgit for the website

    Step 10. After Getting url you can add or share javascript or CSS for your blogger template.To add Javascript in your website use development url like this:
    <script src='https://rawgit.com/ishekharsingh/bloggersstand/master/multitab.js' type='text/javascript'></script>
    and to share code with your readers you must shared production url with your visitors like this:
     <script src='https://cdn.rawgit.com/ishekharsingh/bloggersstand/master/multitab.js' type='text/javascript'></script>
     Step 11. To Add CSS Stylesheet in your blogger use this tag:
    <link rel="stylesheet" type="text/css" href="https://cdn.rawgit.com/ishekharsingh/bloggersstand/master/multitab.js"/>

    magone gold version 4.0.0 free download for blogger websites
    MagOne 4.2.0 Gold Version - Magazine Blogger Template
    Free Download latest new Gold Version 4.0.0 , 4.1.1 , 4.1.0 MagOne template is flexible and responsive magazine template for Blogger / Blogspot websites. Drag and drop to build a magazine website in minute.

    Features:

    • Drag and Drop Widget Builder: only need to change parameters then move widgets to any where to make any layout you want.
    • Flexible Menu Navigation: supports drop-down, link group mega, label content mega, and icons.
    • Responsive: passed all Goolge mobile friendly tests. Working well 100% with any mobile and tablet devices.
    • Multiple Comment Systems: Facebook, Google+, Blogger and Disqus comment systems are all ready to work.
    • Custom Archive Page Designs: pick any design for label / search / archive pages as you want with professional navigation buttons.
    • Super Mega Menu: support Ajax content, group links, drop down, icons and open new window feature.
    • Floating Menu: You can configure to show sticky menu when scroll up or down or both.
    • Sticky Sidebar: Optimize your earning for sidebar advertisement.
    • Shortcode Ready: you can create content very easily with a lot of ready shortcodes.
    • Custom Post Title Design: easy changing your post main title design with default editor of Blogger.
    • Support Sub Post Title: you can add subtitle of post and pick custom style for it.
    • Smart Breadcrumb: not similar breadcrumb of other templates, our breadcrumb will show labels as exactly order automatically.
    • Widgets Ready: template has a lot of built-in widgets: article widgets (slider, sticky, complex, carousel, one column, two columns, three columns, blogging, left and right), quote image widgets, flexible popular widgets.
    • Post Pagination: you can split long post content to pages with simple shortcode.
    • Reactions, Locations, Share Buttons, Author Box, Related Posts are all ready: we don’t miss any thing for your article content, just focus to your content, we will handle your site interface.
    • Fully Template Designer: support most of features from Blogger advance customizer. This template has flexible width also.
    • Template Options: have friendly UI for changing template options easily through SpotSettings tool.
    • Multilingual Ready: template supports SpotLingo to translate to any languages easily and compatible with any RTL languages.
    • Support Service: well documentation and have many ways to support (remote desktop, login as member, email directly).

    Updates and Change log:

    Update: Version 4.2.0 – Mar 20, 2016

    - Fixed: IE not work properly
    - Fixed: Firefox thumbnail image not work properly
    - Fixed: RTL thumbnail image not work properly
    - Fixed: Admin layout not display proplery
    - Fixed: Low page speed insight score

    Update: Version 4.1.1 – Mar 16, 2016

    - Fixed: shortcode not work properly

    Update: Version 4.1.0 – Mar 11, 2016

    - Fixed: double og:url and og:image
    - Fixed: long titles of list box not display properly
    - Fixed: resizer not work properly
    - Fixed: title out of thumbnail not work properly if set color for article boxes
    - Fixed: main menu links target attribute not work properly
    - Fixed: parameter "title" not work properly
    - Fixed: label list in post not work properly if has up to 20 labels
    - Fixed: AFTER POST BODY CONTENT not work

    Update: Version 4.0.0 – Feb 29, 2016

    - Fix: update Facebook API version to 2.5
    - Fix: apply Facebook API meta to header of site
    - Fix: remove Facebook comment canonial and add meta tag to allow moderate comments
    - Fix: add nofollow attribute for comment links
    - Fix: top all page content section not display properly on home page
    - Fix: update FontAwesome to 4.5.0
    - Fix: update jQuery to 2.1.3
    - Fix: share and tweet button of lock content box not work properly
    - Fix: "source" parameter not work properly with "random" or "oldest" 
    - Fix: remove 404 error when sharing on Facebook if preview image first.
    - Fix: increase Google insight speed score
    - Fix: better display when wrapper background is white
    - Fix: show all page when printing a post which has pagination
    - Fix: can not parse URL in comment text if using weird domain extension
    - Fix: eliminate all SEO bugs from Google Structured Data Testing Tool
    - Fix: Feedburner Form can not input in Firefox
    - Fix: Delete comment button show even with visitor
    - Fix: archive page URL not work properly
    - Fix: remove "-square" out of social icon title
    - Fix: display post for archive page URLs: /year/month/ or /year/
    - New: show recent posts for both cases: select all or none select any labels of widget
    - New: provide "title" parameter for more option of displaying item titles in article widgets. 
    Now, you can display title of of thumbnail
    - New: you can select type and all other parameters for popular post widget.
    - New: add demo layout structures into documentation
    - New: show "Label" text before label list in article if user set
    - New: auto add target="_blank" to any external link of menu
    - New: suppport random post link
    - New: hash URL for article widget pagination, so you can return back exactly where you left
    - New: hash URL for long post pagination, so now you can show exactly what you want to your visitor when sharing the page.
    - New: smart sticky sidebar
    - New: sticky menu will show when scroll up

    Hello, we have some great news for our regular readers. We are providing Magone 4.2.0 Responsive Magazine Blogger Template absolutely free. To get the template, please show support to the bloggersstand community by liking or following us on the social media. This will help us to provide an awesome experience and more facilities for our users. Just connect with us on any kind of social media and confirm the same with a comment below including your email information or you can use contact us page directly. We will send you the template as soon as we are happy with your commitment with us. So what are you waiting for, join us for an awesome blogging experience.

    add blogger comments load on show and hide click button in template
    Hello Folks,Today in this article we are going to explain How to Add Blogger Comments Load On click With Show And Hide Function button.In previous post we have already talked about installing the disqus comments on click load.The reason of creating show and display blogger comments click on load is to increase the loading speed of your blog or website.After installing display and close blogger comments trick in blogger template you will see Show and hide button just below the post footer where your comments appear,and when you click on show comments your comments will appear and when you click on hide comments button/tag your comments will hide.
    if you have so many comments on your article then this widget is very useful for you.Because comments takes time to load reason slow your speed of webpage.So you must install show and hide blogger comments trick in your blogger template in order to boost the speed of your website and it also enhance the look of your blog.So to grab this plugin follow the steps mentioned below.

    How to Install Blogger Comments On Click Load In Website

    Installation Steps:

    Step 1. Log in to your Blogger account and Go to your Blogger Dashboard.

    Step 2. Now Click on -> Template -> Edit HTML.

    Step 3. Now Search for <div class='comments' id='comments'> by Pressing Ctrl+F keys.

    Step 4. You will find two times in your blogger template,and we will go for first one after locating first one ,replace the code with the below code.
    <a href="#" id="comments-show" class="displaycomments" onclick="showComm('comments');return false;">Show comments</a><div class='clear'/>        <div class='comments hide-content' id='comments'><a href="#" id="comments-hide" class="hidecomments" onclick="showComm('comments');return false;">Hide comments</a><div class='clear'/>

    Step 5. Now Search for ]]></b:skin> or </style> by Pressing Ctrl+F keys.

    Step 6. Now Copy the below css code and paste it just above/before </style> or ]]></b:skin>.


    /* Display and Hide Comments by www. Bloggersstand.com */
    .hide-content{display:none;margin:0;padding:0;}
    a.displaycomments,#comments a.hidecomments{display:block;text-decoration:none;
    position:relative;color:#fff;font-weight:700;
    font-size:15px;padding:12.5px 0;background:#3B66A8;
    border:2px solid;border-radius:4px;text-align:center;
    margin:30px auto;letter-spacing:1px;transition:all .3s}
    #comments a.hide-content {background:#fff;color:#787D80;transition:all .3s}
    a.displaycomments:hover{background:#fff;color:#3B66A8;}
    #comments a.hidecomments:hover{background:#787D80;color:#fff;}

    Step 7. Now Search for the </body> tag and copy the below javscript and paste it just above/before the </body> tag.
    <script type='text/javascript'>
    //<![CDATA[
    // Show and Hide Comments
    function showComm(e){document.getElementById(e)&&("none"!=document.getElementById(e+"-show").style.display?(document.getElementById(e+"-show").style.display="none",document.getElementById(e).style.display="block"):(document.getElementById(e+"-show").style.display="block",document.getElementById(e).style.display="none"))};
    //]]>
    </script>
    Step 8. Now Save your Template..Done! 

    Install add tweet this quotes sentence paragraph in blogger posts template
    Hello Folks, Today in this article we are going to explain How to Add Tweet Quotes In Blogger Template. You might have noticed in wordpress site when you reading some sentence you can see few quotes are highlighted with the tweet this box in wordpress website or blog.However before this feature is only available for wordpress site's but our team has worked on it and we have bring beautiful widget for tweet this content/article or any quotes or any highlighted important tag lines in your blogger posts.Now Let's your readers share a quote from your blogger posts with the "Quote Tweet This button".Tweet this features is very easy to embed/install with stylish unique tweetable quote/contents box in your article.Pick your most engaging content and highlight or load them into tweet this box.Tweet this is a part of paragraph of your content.
    Benefits of adding tweet this button in your post is that you visitors can share the content on twitter and it might be go viral in this case you will surely increase your page ranking in alexa and also in SERP. Tweet blogger plugin helps you to highlight catchy phrase or sentence in your post and you can easily advertise your website , blog or business on twitter. Nowdays it's become very popular to invite users to tweet a specific section of a post by just installing tweet this box inside your blogger template.To create beautiful tweet this boxes in your blogger website follow the steps mentioned below.

    How to Install Tweet This Box Inside The Blogger Post

    Installation Steps:

    Step 1. Log in to your Blogger account and Go to your Blogger Dashboard.

    Step 2. Now Click on -> Template -> Edit HTML.

    Step 3. Now Search for ]]></b:skin> or </style> by Pressing Ctrl+F keys.

    Step 4. Now Copy the below CSS and paste it just before/above </style> or ]]></b:skin>.

    /* CSS Tweet This Box By www.Bloggersstand.com */
    .bsd-tweet-box{background:#fff;padding:18px;margin:18px auto;color:#666;font-size:18px;overflow:hidden;
    font-family:'Roboto',Helvetica,Arial,sans-serif;border-radius:5px;border:1px solid silver;}
    .bsd-tweet-box p{font-size:130%;font-style:italic;margin:0!important;line-height:1.3em;}
    a.tweet-it{display:block;float:right;font-size:12px;text-transform:uppercase;margin-top:10px;color:#666;
    font-family:'Roboto',Helvetica,Arial,sans-serif;font-weight:bold;
    text-decoration:none;transition:all .4s ease-in-out;}
    a.tweet-it:hover{color:#00aced;}
    .tweet-it i{color:#07ACEC;font-size:16px;}
    .tweet-text:hover {cursor:pointer;color:#00aced;}

    Step 5. Now Save your Template.

    How To Add Tweet This Box Inside Blogger Post

    To add tweet this box inside your blogger posts ,if you want to embed in certain place in your content/sentence when you are writing it,just switch to html mode and copy the below code and past it where you want to display tweet to this box inside your post then switch back to compose mode and hit publish button,now you will see beautiful tweet it/tweet this/tweetable content box inside your blogger post.
    <div class="bsd-tweet-box">
    <div class="tweet-text" id="bsd1">
    How to Tweet Quotes In Blogger By Bloggersstand.com</div>
    <script>
    var twurl = window.location.href;
    var twcontent= document.getElementById("bsd1").textContent;
    var twesc=escape(twcontent);
    document.write('<a class="tweet-it" href="https://twitter.com/intent/tweet?text='+twesc+'&url='+twurl+'&via=bloggersstand&related=bloggersstand" target="_blank" title="Tweet This">\
    Tweet it <i class="fa fa-twitter"></i></a> \
    ');
    </script>
    </div>
    Customization: 
    • Replace Bloggersstand with your twitter username.
    • Replace How to Tweet Quotes with your phrase/sentence.
    • If you are going to add more than one tweet this box ,replace bsd1 with bsd2 and so on.

    how to fix all errors missing and required from blogger website in google structure data testing tool
    Your Blogger template is error free from google data structure testing tool ? Do you know what is structure testing tool ? Know the advantages of fixing google Structure hatom, Image url , Date published error , date modified error , author error , main entity of page etc.

    What is Google Structured Data Testing Tool ?

    Google Structured data is the very important tool to help you to grow your business or website.Structured data markup enable the rich snippets for your website.Structure data Directly added in the HTML markup and from their search engine use your website or blog markup in order to index in better way.You can use Schema.org vocabulary for adding Structured data in your website or blog in blogger template.Structured data testing tool use your markup information to index your business website or blog in SERP listing.In simple words Structure data make your website HTML easier to understand by crawlers to get important information regarding your business website or blog like Who is the publisher or author of the content , name, Address , Url , Date Published and Modified , Copyright , Navigation Menu , Breadcrumbs , Webpage ,Articles Information , recipes etc.You can see this error from google tool to validate and test by visiting https://developers.google.com/structured-data/testing-tool url. If the Structured data not installed properly in your webpage or not have you can see google search console will display a error with a name  items with errors 

    Important Schema markup factors to Resolve in Blogger Template


    In this Article we have shared information of installing , adding Schema.org markup in your blogger template.Important tags to add and use in correct way in blogspot theme.Here you will get to know what is Schema.org markup and how to use in blogger website for better SEO In google SERP.


    If you have are not aware with what is google schema meta tags for better indexing your website or blog in google search result page.you will get to know how to implement google schema.org meta tags in your blogger theme.Like to display better title for your article , Url , social media profile links , social media network sharing etc.


    You have added review rating schema.org markup in your blogger template to show/display start ratings by in google search result,you must install to display ratings for your content in google.in order to use ,you must install schema review rating markup trick in your blogger template.


    If you have not installed Schema.org framework in your template, this tutorial will help you to understand the schema.org markup property to add in your blogger website.In order to use correct schema structured data you must create framework.


    In order to get index your breadcrumb properly in google search result page you must add schema.org markup on blogger breadcrumb. This will also helps to increase your ranking because breadcrumbs works like a keyword in SERP. so in order to get your website or blog index perfectly you must install schema.org markup on blogspot breadcrumb.


    Your Blogger website is showing Image:missing error in google structure data testing tool ? AMP article error ? Then you must check your blog and reinstall and if not yet installed add them now ,because your images won't get scroll unless and until you will not fix image:missing error from your blogger template.in order to improve your SEO ranking and let google index your images to you must fix it.


    In order to let google understand who is the publisher of the article/pots/Any information provided in website or blog, you must fix publisher missing error from blogspot theme.


    Your website is displaying missing:author error in blogger template ? learn how to fix post hentry microformat error from website or blog.In order to display author information in google you must fix missing:author recommended required error.


    fix hatom google structured data testing error from blogger template ? learn how to fix all errors from blogger static page of website.Resolve and make your template error free from google structured data error you must install Schema.org markup  in your blogspot template. 

    MKRdezign

    Biểu mẫu liên hệ

    Tên

    Email *

    Thông báo *

    Được tạo bởi Blogger.
    Javascript DisablePlease Enable Javascript To See All Widget